Showing posts with label gifts. Show all posts

Wednesday, June 15, 2016

Weekender Bag Tips and Modifications - Part 1 - Planning and Piecing


There are so many blog posts out there about the Amy Butler Weekender Bag pattern. When I decided to make my first one two years ago, I was overwhelmed by all of the blog posts and finally just decided to work through modifications on my own. I am on my third bag joining up with the Weekender Bag Sew Along hosted by Sewlux and Happy Little Cottage, and I am trying some new techniques. Chrissy from Sewlux has a ton of really great tips on her blog and has made some stellar bags.

I tend to use my blog to earmark how I make things so that I can remember down the line. I made lengthy handwritten notes with my first bag and typed them up into a lengthy blog post. It was pretty helpful for the second bag I made and to reference this time around as well. But I also blog to give more detailed info and everything in one spot for people who are interested. If you are on Instagram, you can take a peek at the hashtag where I posted the evolution of each bag #threeowlsweekenderbag and the 2016 Weekender Bag Sew Along hashtag where there are so many creative people joining to to make this crazy bag that allows for a million modifications - #wbsa2016. I am moving way ahead due to multiple obligations next month as well as needing to clear out the piles of cut pieces and supplies.


It was pretty ridiculous. All those 1/2" hexies and multiple quilt blocks.Here it is:


I am making this third bag for my oldest daughter and I wanted to make something cool, but not as complex. I also wanted to try and use duck canvas behind batting rather than my Peltex behind batting method.

Planning:

All Cotton + Steel fabrics - mostly Tokyo train ride and some Melody Miller

Piping and straps - c+s navy sprinkle counting stars

NOTE ABOUT PIPING AND STRAPS:
I buy one yard to make bias cut piping for this bag with some leftover, but it makes nice long strips that have less joins. Since I used the same fabric for straps, I bought 1.5 yards. See below for cutting straps.

Piping made using piping foot not the Steam A Seam method this time (takes forever!)
I think I would also be willing to try glue basting with Elmer's. I love Elmer's Glue Stick for sewing so much that I buy it in bulk.

Quilted 1/4"ish with batting on entire exterior

Duck canvas behind batting for main panels, top panels, bottom panel

Top panel and main panels: Quilted but not pieced 

Main Panels:
No piecing
Main panel 1 - Melody Miller Bees
Main panel 2 - Tokyo Train Ride

Straps:
Lengthened 1.25" x 52" finished with 1.25" webbing inserted 
I cut the strips WOF and joined them with a diagonal seam
This is .25" narrower than my previous straps and I like it just as well.

Exterior Pockets:
No canvas - batting only
I don't think it is necessary and would be pretty bulky.

Main Pockets:
No canvas - batting only
Main pocket 1- Tokyo train ride canvas scene - no piecingMain pocket 2 - 2" finished patchwork

End Pockets:
No canvas - batting only
End pocket-mustard mustang
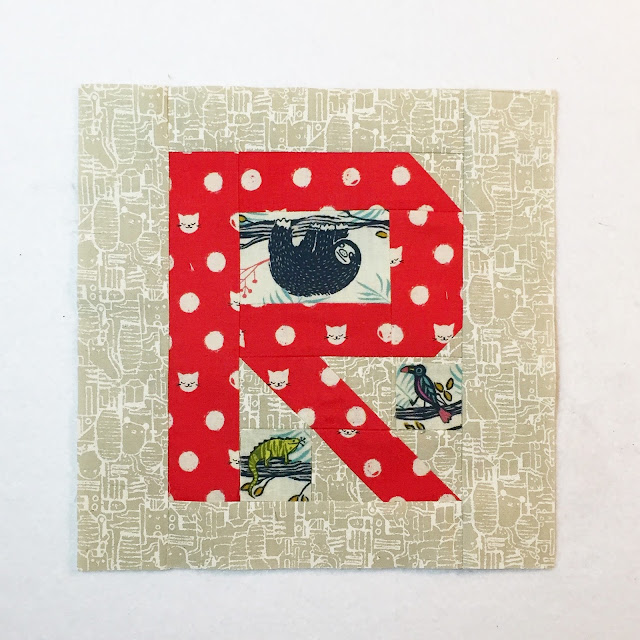
End pocket - first initial "R" using reduced size Spell it With Moda pattern (pic below)

Interior:
Interfaced with shape flex SF101Lined slip pocket on one side - using main pocket panel pattern piece, stitched down middle to make two slots. Cut one exterior and one lining, stitch across the top RST, turn right sides out and topstitch, baste to lining, stitch down the middle to make two slots.
Inset pocket on other side with 9" zipper (see below for dimensions)

Bottom exterior:
Navy duck canvasOne layer of Peltex behind duck canvas bottom 1/2" smaller all around - both quilted to batting 

MAYBE two layers of Peltex to insert in bottom - adhere in place after bag exterior is completed using spray adhesive (because I am lazy and don't want to use the interfacing method. I'm also not convinced that this particular bag version needs it with the Peltex, canvas, and batting already on bottom.)

False bottom:
Same as pattern

Lining:
Hand stitched in same as pattern

Exterior zipper:
Separating Sport Zipper tacked on the separating end - it is hard to find 30" non-separating zippers

Prepping:

Most of the time when I make something, I like to bounce around between cutting and sewing. I don't really like to do that with the Weekender Bag though. I like to cut all of the pieces, then prep them, quilt, assemble.

I knew I wanted to use a lot of Tokyo Train Ride by Sarah Watts. I bought a lot of it and was gifted a nice selection of it, and my daughter loves it. I pulled a bunch of fabric and gathered supplies to start editing with her input. I also grabbed my bag so I could measure my interior zip pocket placement. I made my piping and straps before I did anything else.


Straps:

I attached using the same method I previously used and with webbing inserted instead of Peltex. I mark the top line as the pattern states and I sew across there and edgestitch all down the length of the straps on both sides and then sew an X at the top attachment even more stability. I usually just eyeball the X box, but using chalk to mark probably made for a better result.


Interior pockets:

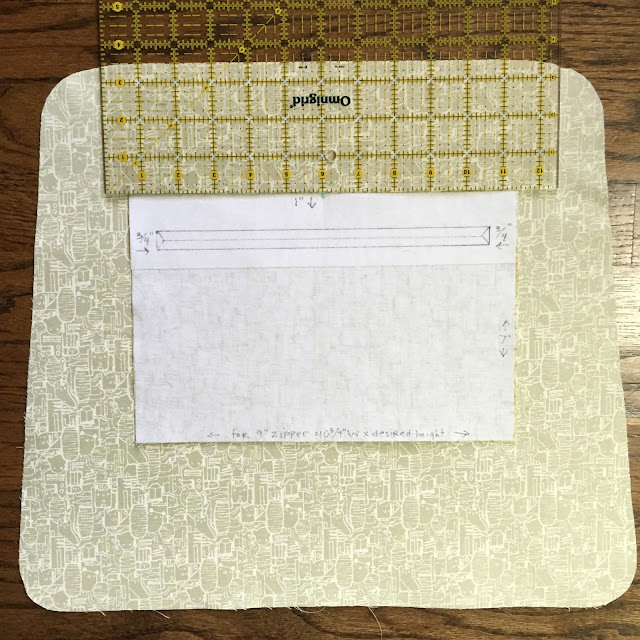
Here are the particulars if you want a 9" pocket as well. So many tutorials for zipper pockets. I like this one.

Cut two rectangles 10.75" W x 7" H (not super deep but deep enough to fit some stuff without it getting lost).

Centered 3.5" from the top of the lining. Draw 1/2" tall rectangle 1" down and 3/4" in on each side.


Here is a pic of my pockets in very bad late night lighting:


Pieced main pockets:

I really like to use wax paper or freezer paper to help me plan out how much of what I need and what it looks like prior to stitching, especially since the pocket is angled. I was thinking 2" patchwork so I mocked it up on freezer paper. When I made my hexie pocket previously, I used wax paper cut the shape of the pocket to see how much to keep adding.

I know it took a few minutes, but by mocking up my patchwork pocket on freezer paper, I was able to quickly see how my pocket panel would look with mini charms centered and how to cheat around the edges that will be mostly hidden by the 1/2" seam allowance. 


Here is how I did it if you are interested in not using squares for the sides that will be covered:


(40) 2.5" squares - 8 across x 5 down
On each side: (2) 2.5" T x 1.5" W strips at the bottom 

and (1) 7" T x 1.5" W strip at the top (only about 6.5" needed so trimmed down after attaching). 


I pieced the squares first and then added the mishmash scrap on the sides after. The long strips will almost all be hidden in the seam allowance. 


(These measurements have some overage on all sides to quilt and then trim to size.) 


Quilting panels and then cutting to size - or not:

I couldn't easily go bigger on the size of the quilted panels when I did the method with 1/2" smaller Peltex behind the batting and I didn't do that on most of my panels here - I just cut my main panels with the pattern piece, basted, quilted, trimmed. I used my walking foot with the presser foot pressure super low and occasionally stitched from the opposite direction.

It might be a good idea to make the panels bigger, quilt, then cut down, because it can shrink up, but it worked fine three times, but please don't try it my way and get mad if it doesn't work - do at your own risk and stop if it is warping badly. LOL

I definitely cut using the top panel pattern piece and then quilted. The sheer amount of waste in my aqua Farmdale Blossoms with the first bag would have made me cry. I also fussy cut the Tokyo Train Ride print I used for this bag and it was easier to cut first. You have to be SO careful about basting this evenly though. I cut my batting and canvas nicely and used my 24" long acrylic ruler to help and spray basted it without a lot of stretching.


Quilting: 

I did my Ish Quilting - not exact. I love the texture, but densely quilting will add a million pounds to the weight of the bag. You can also see more of the straps and piping across the top of the main pocket as well.


End pocket:

I really love how this block turned out! My daughter LOVES sloths, but who doesn't?


Bottom Panel:

I wanted to sandwich the Peltex (cut 1" smaller, so 1/2" smaller all around so it doesn't get in the seams during bag construction). I layered canvas, then the Peltex with basting spray, then batting.

I'd also like to say that I added feet to the bottom of my first bag and it was a mistake. They weren't big enough and it was stupid and pointless, and I am still mad at myself. If you do it, buy some good size feet.


Ok, in my next post I will have my piping corner cheat that helped me avoid having my corners eaten in the bottom curves during assembly and some actual assembly tricks I figured out on this bag for an overall better effect. Well, for me anyway. There is no right or wrong, just what works best for each individual person. I hope to have that post up pretty soon. My bag exterior is done and just needs a lining. :)

Saturday, August 8, 2015

Project Caddy Pattern by Aneela Hoey


Earlier this summer, I was thrilled to have the opportunity to test Aneela Hoey's new Project Caddy Pattern. Aneela writes very clear and detailed patterns with great design, and this pattern is no exception; I love the lid construction and zipper installation. So clever. This caddy was the perfect size for my college age daughter to take on her beach vacation to tote essentials.

Caddy Details:
Fabric: Bonnie and Camilly Daysail
Exterior Patchwork: Mini Charm Pack
One complete mini charm pack works perfectly to piece the exterior
14 squares across x 3 down
There is an extra ½” that needs to be trimmed off to make the panel 28” across. To account for that, I just chain pieced four sections more towards the side of the panel, 2 across and 3 down and then trimmed 1/8” off those four before attaching them to the rest of the panel

I absolutely love the handled lid and double zipper on the exterior of the caddy. I am always interested in learning new techniques, and Aneela made the lid construction a breeze. With an added interior zip pocket and open pocket, it is easy to keep your items organized. 

Construction options:
I appreciate that Aneela designs her patterns to be easier to assemble with less machine wrangling. I tested the pattern as written, but I am not afraid of a little machine wrangling (my motto: interface all the things and then interface some more), so I made some notes with two options in addition to the pattern instructions for the intrepid assembler to make the caddy sides super sturdy. 


1. Quilted exterior: Add batting and then fuse Peltex 71 (cut the size specified in the pattern) on the back of the batting and quilt through all of the layers (or use Peltex 70 behind the batting and hold in place with basting spray to quilt). 

When I pieced my weekender bag panels, I used the fabric with shape flex fused behind, batting behind the shape flex, and then a smaller piece of Peltex basted behind the batting. I quilted through all the layers. I was so happy with the outcome, and I think the same technique works well here.

2. Peltex 70 placed behind the exterior panel (1/2” from the bottom edge) with a piece of Shape Flex the same size as the exterior panel fused over the Peltex 70. The Shape Flex will hold the Peltex in place.


The interior has a huge amount of storage to carry projects, toiletries, toys, etc.


Tuesday, August 4, 2015

The Hexie Box Pattern


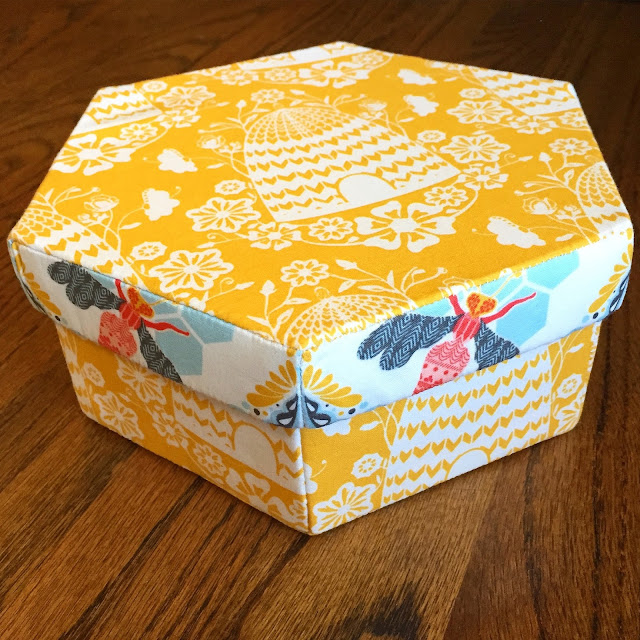
Recently, I had the opportunity to test a fun new EPP hand sewing pattern called The Hexie Box by Amber Crawley. Amber asked me to test the large 7" box, and I knew it was the perfect project to use some of my stashed Sweet as Honey fabric.

My eldest daughter said recently that she needs more gold accents in her room, so I made the exterior the gold beehive print. I am pretty excited that I used supplies entirely from my stash, including scrap Peltex (I knew I was saving it for a good reason).


I wouldn't call the large size a quick project. Using Netflix shows as a guide on the time spent to make this box, it took approximately nine hours from start to finish. Bear in mind that I fussy cut all but the exterior side panels. I would have also fussy cut those, but the beehive print is staggered and I couldn't bear to cut holes in a half yard of fabric to make the beehives all match on each side. I feel like the lid side fussy cuts more than make up for that. I also stitched a million tiny whip stitches to make the box extra sturdy. All well worth the effort and time.

The pattern gives basic instructions on how to thread baste the fabric to the interfacing, and mentions glue basting. I usually prefer to thread baste, but on this project I am all about the glue basting. I didn't mess around with a little glue pen, and went straight for the Elmer's glue stick; I used a fair amount of glue. My one tip would be to glue the interfacing and try not to gunk the glue all over where you will be stitching because the resulting stiffness makes it harder to sew through. The patterm also calls for Peltex 71, but I didn't have even a scrap left on hand, so I just used a glue stick to baste the fabric to the Peltex, and heat set it with my iron; it worked perfectly.

I'm ecstatic with the finished project; the design is genius and flawless, and it has a very functional and satisfying sturdiness.

The Hexie Box pattern is now available to purchase on Craftsy.


Wednesday, July 22, 2015

Pouch with a View Pattern


I'm very excited to announce the release of my new Pouch with a View pattern. It's been a whirlwind week of samples and testing! Take a peek here at the pouches my friend Ellyn tested and made in about 18 hours, including one with a teeny, tiny pieced hexies WIP she had on hand.

The pattern is available on Payhip and Etsy.

Pattern features include:
Four sizes (14" x 14", 11" x 11", 8" x 8", 5" x 5")
Vinyl window so you can see what is inside
Patchwork and plain panel exterior options for all sizes
Fully lined interior
Easy binding method (contrast binding is still an option)
Detailed step by step pictures and diagrams

Size comparison:

Some of my best ideas hit me out of nowhere like a hammer on the head. I was sitting on the sofa one night digging 1/2" hexies out of a gallon size Ziploc bag, and I was suddenly overcome with shame. I am a quilter, bag maker, owner of countless pouches. WHY am I using ugly plastic??? The answer was really that Ziploc bags are handy, and I didn't have a single pouch that was comparable, nor have I seen a pattern quite like the one that suddenly appeared in my head.

The exact moment of inspiration:

I dropped my hexies and grabbed a pencil to start drafting a pattern with three sizes. It was already late, and when I went to bed all I saw was patchwork and binding and vinyl and storage I can be proud to use in public. I woke up early and started sewing. I was so pleased that it worked out, and that I could use up some of the scraps that I am drowning in (hence all the 1/2" hexie basting and sewing). It's like a a hexie I Spy bag, and I love it so much.


I wasn't the only one who was struck with pouch fever. E NEEDED to have at least one of her own to store Barbie shoes or Polly Pocket accessories (really, those things are the devil to keep track of). And so I made a second large one in Tasha Noel Vintage Market fabric.


The large size easily holds two decades and three childrens' worth of Barbie accessories:


And a medium size in Bonnie and Camille Daysail:


And a small one in Bonnie and Camille Vintage Modern:


 And a small one with the tiniest patchwork ever:

Now added to the pattern, an extra large 14" x 14" pouch. It's the perfect size to store unfinished 12" quilt blocks.


These pouches are so fast to make, and really satisfying to stack, sort, fill. I hope you will give the pattern a try. Feel free to post your creations on Instagram with the hashtag #pouchwithaview


Monday, March 30, 2015

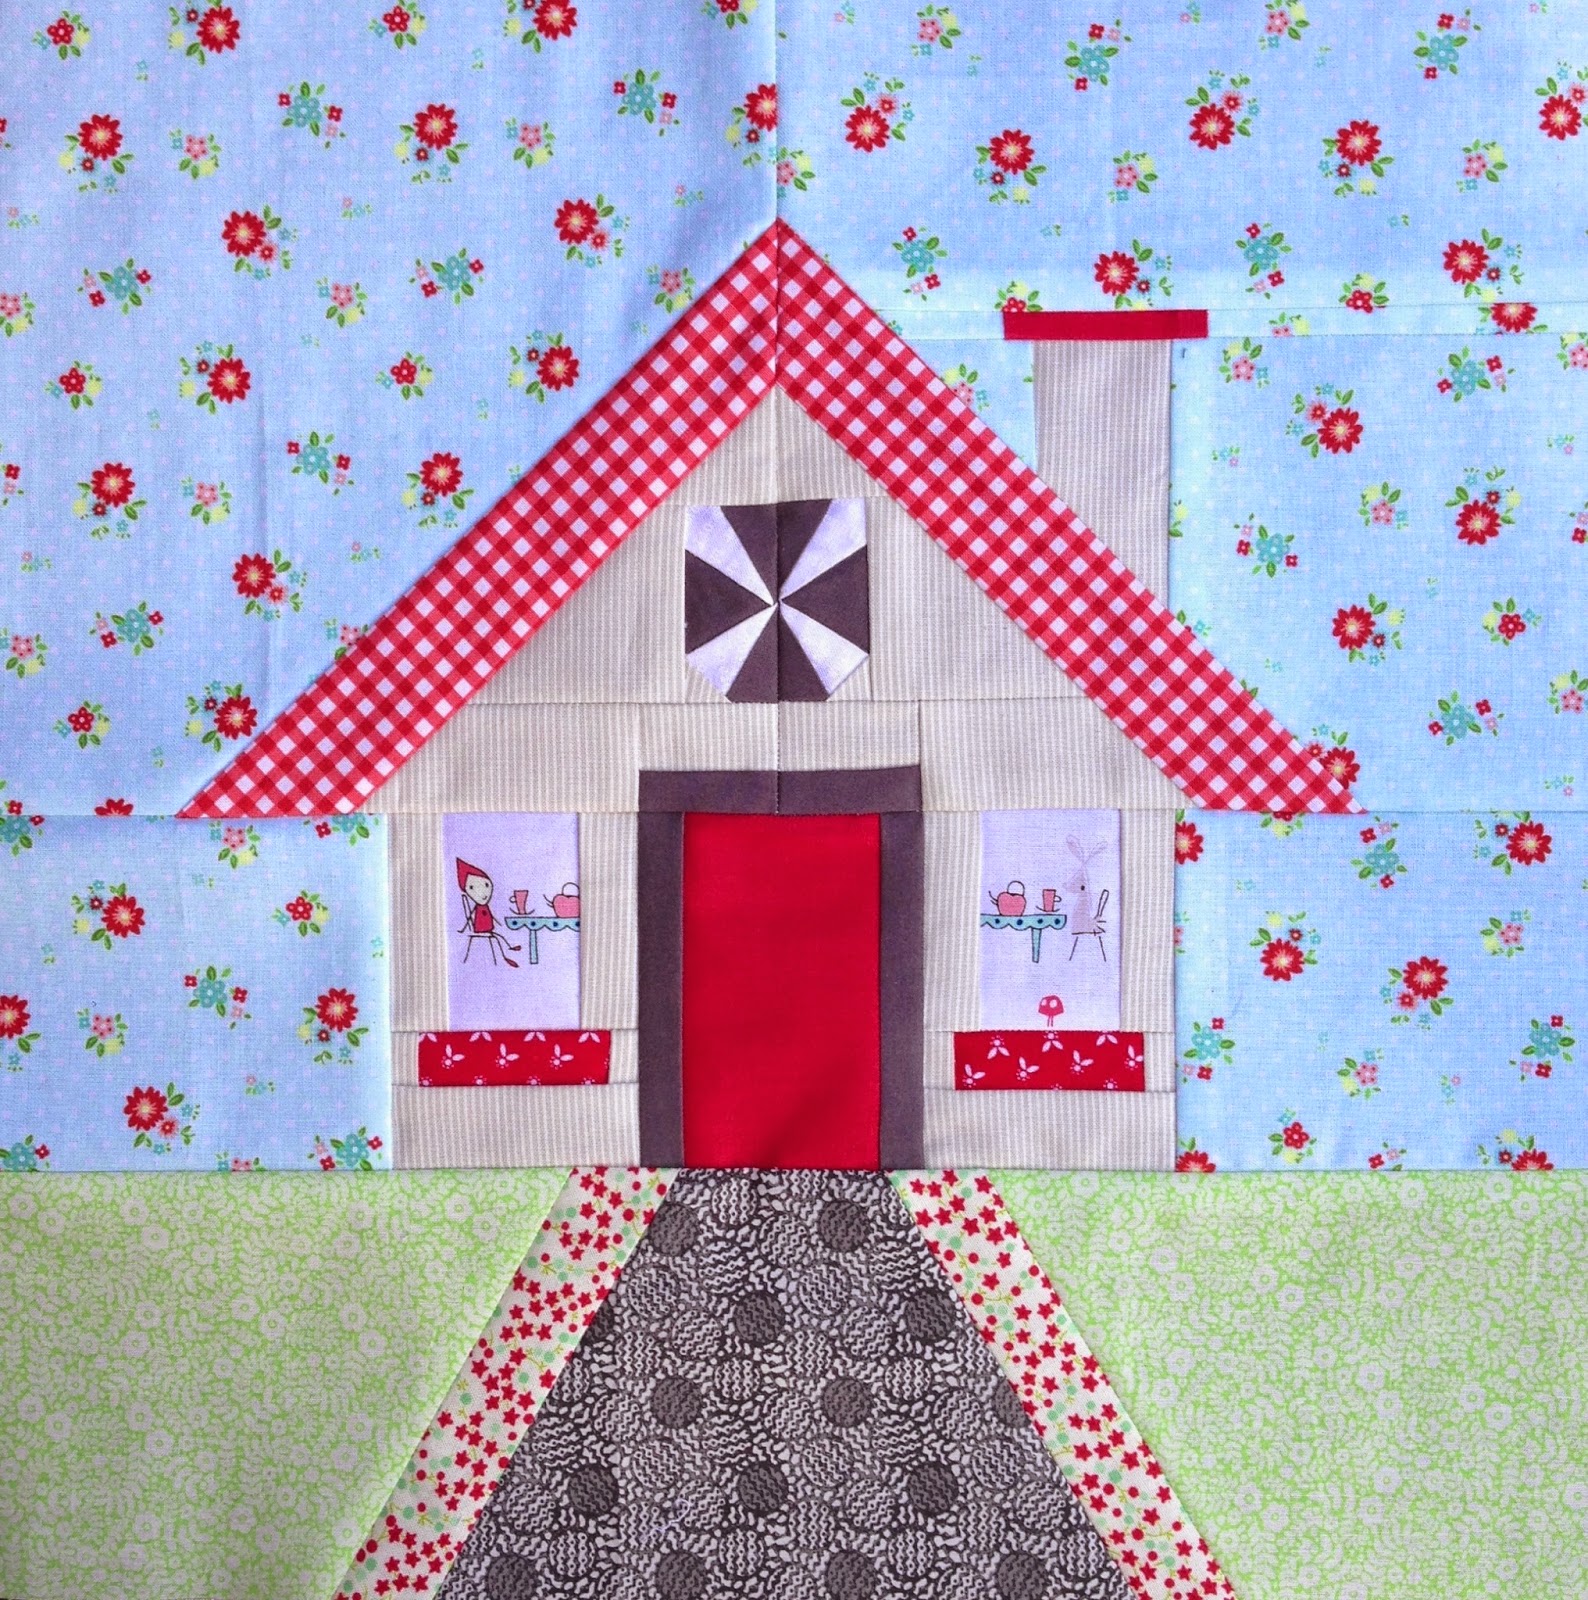
Vintage Candy Cottage Pattern


I drafted a pattern for a holiday pillow swap a while back, and I added extra pattern pieces which can be substituted to make the pattern with a year round theme. The Vintage Candy Cottage pattern was once available to purchase on Craftsy, but I now have it available on Payhip. I dusted off my pattern this month to make a pillow for a friend. I used some of my favorite Tasha Noel fabric for the house and border, and quilted with 1/2" diagonal crosshatching and Miss  Kate red and white scallops for the binding. Pillow finishes at 20" square.


The original Vintage Candy Cottage pillow I made for a holiday swap adds candy canes to the yard and wreaths to the windows, along with a patchwork border.


I made a spring mini quilt for a friend last year with 1/4" crosshatch quilting and also using my favorite Tashe Noel floral, this time in aqua for the background.


At some point I would like to make myself a mini to hang in my sewing room, but I have many other things planned before I get there.

Friday, March 20, 2015

Rainbow Meadow Mini Quilt + Giveaway


I am excited to participate in the Shabby Fabric 2015 Blogger Challenge. This blogger challenge highlights the versatility of the pre-fused laser cut Shabby Shapes. You can see the whole selection of available shapes here. For my mini quilt, I selected a set of small 2" butterfly prints and a set of small pindot tulips. I've included instructions with how I made this mini quilt, but it is really more of an improve piece.


Rainbow Meadow Mini Quilt
Finished Size: 20" x 20"

Materials:
6 Shabby Shapes pre-fused laser cut small tulips
Shabby Shapes pre-fused laser cut leaves and stems for 6 tulips (12 leaves and 6 stems)
9-12 Shappy shapes pre-fused laser cut small butterflies (or 6 small and 3 medium butterflies)
1 fat quarter (18" x 21") of background sky fabric
1 strip of 3.5" x 21" green grass fabric
Assorted 1.5" wide strips of rainbow color fabric
Approximately 6.5" square of yellow/orange fabric for sun
23" square of quilt batting
23" square quilt backing fabric
(2) width of fabric strips cut 2.25" (or preferred width) for binding

Mini Quilt Assembly & Finishing:
The layout of this mini quilt is a simple process, less about precision and more about fun. Square up the background sky fabric; orient it so that it is 18" vertically and 21" horizontally. Lay the various components out on top of the background fabric. Trim tulip stems to approximately 3" tall. Align the tulip stems along the bottom edge of the background fabric. Once satisfied with the placement, peel the paper backing off of each pre-fused shape and fuse them in place with an iron. So easy! Attach grass fabric strip to bottom of background fabric with 1/4" seam allowance. If you are concerned about placement of the tulip leaves to prevent them getting stitched in the seam allowance, you may fuse those after adding the grass fabric; I fused them in place 3/8" from the bottom edge of the background fabric prior to adding the grass strip.


I whip stitched by hand around each shape, but machine sewing works great as well. 


To make the sun shape, use a large bowl turned upside and move it around on the corner of the background fabric until you find a size that you like. Trace the shape on freezer paper, cut it out, and iron the freezer paper on to the back of the sun fabric. Add a 1/4" seam allowance, cut the fabric, and press the seam allowance to the wrong size of the fabric. Alternatively, you may leave the edges raw if you prefer. Use pins or water soluble glue to hold in place to applique.


For the rainbow - I laid out my 1.5" strips, using lengths in each color corresponding with lengths needed to extend from one edge to the next and estimated by laying them on the background fabric, but longer strips can be pieced together and then cut down. Once the rainbow strips are pieced, lay in place face down on the mini quilt top and stitch the violet strip in place with a 1/4" seam allowance. Turn under 1/4" seam allowance on the red strip, flip the rainbow right side up and sew in place on the upper right hand corner of the mini.


Once you have all of your shapes appliqued down, baste your quilt sandwich, quilt, and bind as desired.

I gave hand quilting a try on this mini. This is the largest project I have ever hand quilted, and it is not easy for me to master the quilting needle rocking motion. It looks kind of cute, but it's not as flat as I would like; maybe I'll use a hoop next time. More practice is needed.


Giveaway

Now for the fun part! Shabby Fabrics has graciously given each blogger a set of pre-fused laser cut shapes to give away. To win a set of these small 2" tulips in pindots, please leave a comment below (be sure to leave an email). Contest closes Tuesday March 24, 2015 and is open to international entries. Contest winner will be notified via email.


Be sure to check out all the other great bloggers who are participating in this blog challenge.