Thursday, November 13, 2014

Dainty Tote Bag Tutorial


Shabby Fabrics sent me a gorgeous grapefruit colorway fat quarter bundle of Mimosa by Another Point of View for Windham Fabrics, along with a half yard of dark gray yardage, to make something fun for my blog. I am touched by the generosity of Shabby Fabrics, and their faith in my fledgling blog and quilting abilities.

Shabby Fabrics was also kind enough to offer my blog readers a discount on fabric good through December 12, 2014. Scroll to the bottom of the post for the coupon code.

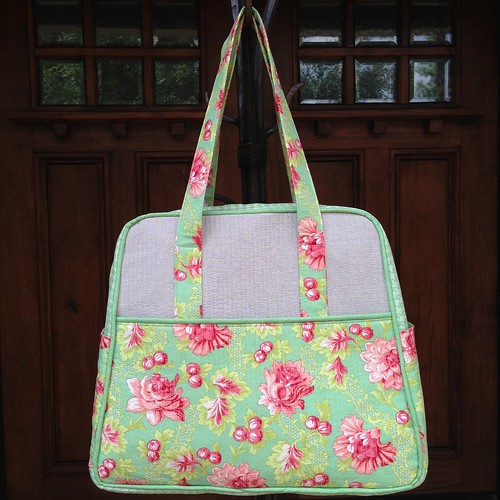
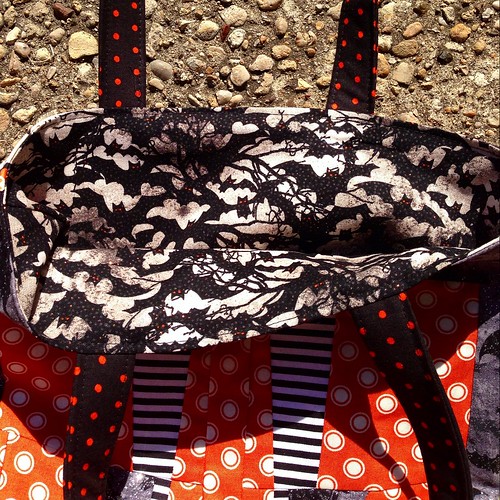
I used a few pieces of Mimosa from my stash to add to the patchwork exterior and drafted my Dainty Tote tutorial. I have made a couple of versions of this little bag in the past few months, but I made a few modifications and I am ready to share it. This is a bit of a fiddly pattern in a couple of places. There are some curved seams with binding that make for interesting wrangling, but it is completely doable. I am giving instructions for a zip top panel, but if you are deathly afraid of zippers, you can substitute the zipper for a magnetic closure at the top.

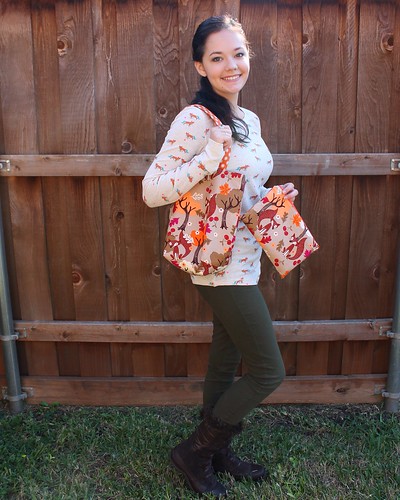
This is a small, but fairly deep bag (hence the name Dainty Tote). The handles are short, with a 4" handle drop to carry in your hands or on your forearm. Strap length can be easily adjusted.

To download a free PDF of this tutorial, please see the listing in my Craftsy store.

Approximate Finished Dimensions
10" W x 4" D x 7" H; handle drop 4"

Materials

Exterior Main Panel:
Panel:  (Cut 1)10.5" wide x 18.5" tall
For patchwork panel: (45) 2.5" mini charm squares - 5 across x 9 down
Batting: (Cut 1) 12.5" wide x 20.5" tall
Non-quilted option: substitute fusible fleece in place of batting (cut 1) 10.5" wide x 18.5" tall

Side Panels (Exterior and lining):
Fabric: (Cut 4) rectangles 6" wide x 7" tall (will be cut with attached pattern piece after assembling)
Batting: (Cut 2) 6" wide x 7" tall
Non-quilted option: substitute fusible fleece in place of batting (cut 2) 6" wide x 7" tall

Lining Panel:
Panel: (Cut 1) 10.5" wide x 18.5" tall
Interfacing: (Cut 1) 10.5" wide x 18.5" tall mediumweight interfacing. I used Pellon Shape Flex SF-101

Handles/Bias Binding:
One half yard of fabric - see cutting directions below
Handles Interfacing: (Cut 1) 6" x 15" - use heavyweight interfacing if you want handles to stand upright. I used Pellon 808 Craft-Fuse

Zip Top Panel:
Top Panel Fabric: (Cut 4) 1 5/8" wide x 10.5" long
Top Panel Interfacing: (Cut 2) 1 5/8" wide x 10" long. I used SF-101
Zipper End Tab: (Cut 1) 3" wide x 2" tall

One 9 inch zipper

Side Panel Pattern Piece DOWNLOAD HERE 


Make Bias Binding

You will need approximately 76" of bias binding. Use your favorite method to make the binding. For this tote, I use matching handles and bias binding fabric, so I prefer to start with a larger cut of fabric to avoid joining binding. Following is the method I prefer to use for this bag. Take one half yard of fabric, square up, and remove selvages. Fold one corner down at a 45 degree angle and smooth the bottom end to a nice point. 

Take the bottom point and flip it up along the fold line you just made to meet at the top left of the fold.

Using your ruler as a guide, trim off a tiny sliver the outside double fold of fabric at the top right. Then cut two 2.25" wide strips along the length (or 2.5" if you prefer that width). Cutting this way, you do not need to join your binding strips to bind the bag. There will be four strips of fabric - two longer and two a bit shorter. 

Make Handles

From your leftover bias binding fabric, cut handles. Cut one rectangle 6" x 16" (top left pic). Fuse your 6" x 15" interfacing so that it is evenly centered on the fabric. There will be 1/2" on each end of the fabric that is not interfaced (top middle pic). This will make it easier to tuck under the raw edges at the bottom of the handles. Cut the rectangle in half lengthwise so you have two 3" x 16" handles. Fold down the 1/2" edge that is not fused with interfacing on each end (top right pic). I like to use a little water soluble glue to hold the folded edge in place. Fold each handle in half lengthwise and press a crease down the center (bottom left pic). Fold each raw outside edge in towards the center crease and press (bottom middle pic). Topstitch around the entire perimeter of the straps approximately 1/8" from the outside edge (bottom right pic).

Exterior Panel

If you are quilting your exterior panel, baste batting to the backside, quilt as desired, and trim to 10.5" wide x 18.5" tall. If you are leaving your panel with a plain exterior, use fusible fleece on the backside of the exterior.

Make Side Panels

If you are quilting your side panels, make a quilt sandwich with the side panel ractangles. Lining facing down, batting, exterior facing up. Quilt as desired, then use the attached pattern piece to trim to size.

If you do not want the side panel lining quilted, baste the lining fabric to the exterior and batting after quilting. If you are not quilting the exterior or lining of the side panels (or the whole bag), fuse fusible fleece to the exterior, and then baste the lining fabric on the back and use attached pattern piece to cut to size.

Note: If you want more space between the top zip panel and the side panels than I have on my finished bag (they touch as I have them constructed), trim 1/2" from the top of the side panel pattern piece prior to using.

Attach Binding to Top of Side Panels

To make the most of the bias binding and avoid having to join it, grab your two longest pieces of bias binding. Each of the long strips is long enough to bind a side panel and an 18.5" long edge. Trim the angled end straight, attach the binding to the exterior of the side panel with 1/4" seam, trim the excess length, and set it aside to use on the long edge. Do the same with the second side panel and the second long bias binding strip.

Flip the binding to the lining side and stitch in place, either by machine or by hand.


Attach Handles

On each short edge of the bag, position the bottom edge of the handle 2" below top edge of the panel. Position the outside edge of the handle 2.25" from the outside edge of the exterior panel. I like to use Wonder Clips to hold the top edge straight a glue baste the bottom inch or so in place with water soluble glue (heat seat in place on the bag after applying a small amount to the back of the handle). This keeps the handle from wobbling around while I am trying to sew. 

Attach the handle to the bag by sewing a rectangle with an X through the middle. I mark my straps with water soluble marker or Frixion pen. Draw a horizontal line 1.25" from the bottom edge of the strap and then an "X" from corner to corner. Stitch in place around the perimeter of the rectangle, going over your topstitching lines, then sew an X through the middle. Make sure your rectangle does not come up higher than 3/8" to the top edge to allow room to attach binding later.

Baste Lining Panel to Exterior Panel

Using a long basting stitch, baste lining panel to exterior panel. Make sure to fold handles out of the way when basting the top edge.

And now your bag will look something like this:

Attach Side Panels

This is where the potentially tricky part begins. Just take your time and it will work out. Mark the center on each side of your lining panel (it will be 9.25" from the edge). Fold your side panel to find the center of the panel and mark it. Lay the side panel on the lining panel, matching center marks.

Wonder Clips are super handy for holding the side panel in place to baste it. Starting from the bottom center, matching raw edges, clip or pin the side panel to the lining side of the bag. Make sure that the top of your side panel ends at the same distance from the top of the bag on both sides. It should be approximately 1/2" to 5/8" below the top edge, depending on how snug your binding is on the side panel. (And yes, I am quite liberal with my use of clips.)

Baste your side panels into place. The first time I made this bag, I machine basted the side panel into place. It was difficult to keep the pieces from shifting. Now I take three minutes to hand sew a basting stitch. It is just as fast, and it makes attaching the binding easier and nicer looking.

Attach Binding to Side Panels

Grab the two pieces of leftover binding you used to bind your side panels. Using a 1/4" seam allowance, attach binding to the side panels, starting the top edge, working around the curves and the bottom, and up to the top edge on the other side. Take time to stop and position your bag so it is not rumpled underneath when you are going around the curves. Also use the bit of stretch in the bias binding to ease around the curves and make sure the raw edges of the binding meet the raw edge of the bag. Hopefully, the collage will help to illustrate how to sew on the curves.

After attaching the binding to the side panels, press around the binding to help the bag lay nicely.

Flip binding to the bag exterior and stitch in place. I have only tried hand stitching the binding, but I would love feedback on whether machine stitching the binding works nicely or is too fiddly.

Make Zip Top Panel/Attach Zipper

Fuse interfacing to two of your 1 5/8" x 10.5" long fabric zip top panels. Position the interfacing so that 1/2" of one end of the fabric is not interfaced (much like the handles, but only on one side). The interfaced pieces will be the exterior of the panel and the non-interfaced pieces will be the lining of the panel. You can also interface all the pieces if it is easier to keep track of when you are assembling.

On each of the four panels, fold back one end 1/2" and press into place. This will cover the raw edges by the zipper pull. The side of the panel with the closed end of the zipper will be covered by an end tab.

Trim 1/4" off the closed end of the zipper tape. You will line that edge up with the raw edge end of your top panel fabric.

Make a zipper sandwich as illustrated in the pictures below. Lay a lining panel piece face up, lay zipper tape with zipper teeth up on the right hand side of the lining panel fabric. I have included instructions on how I like to attach the zipper, but use whatever method you are most comfortable with, if you have a preference. Baste the zipper tape to the lining fabric (top pic). 

Pull the top of the zipper tape (the excess bit that sticks up over the top of the panel) by the zipper pull to the right until the metal end is just over 1/4" from the outside edge of the long edge of the panel, and tack it into place with a few stitches (top left pic in collage). I like to use wonder tape or water soluble glue to hold the rest of the length of the tape in place without pins or shifting. Once the top of the zipper tacked down a bit, you can pull the zipper tape above it even more to the outside of the fabric so it doesn't peek out when you sew the zipper sandwich together (top right pic). 

Take your interfaced exterior panel piece with the folded edge and lay it face down on the basted zipper. Line up the folded edges and the long raw edges (top right pic). Baste into place. Using a zipper foot, sew zipper sandwich with 1/4" seam allowance (bottom left pic). Optional: once your zipper sandwich is sewn, trim the zipper tape between the folded end pieces at an angle if any of the tape is still peeking out (bottom right pic).

Sew the second side of your zipper.

Lay exterior interfaced piece face down, folded end at the top. Lay the zipper tape face down, and the lining piece on top, face down, with folded edge at the top. Make sure that all of your folded end pieces are facing the zipper pull, and that the raw edges are at the closed end of the zipper. Baste and sew using the same method as the first side.


Topstich Top Zip Panel/Attach Zipper End Tab

Press back both lining and exterior panel pieces from the zipper. Match the folded edges of the panel by the zipper pull carefully. Starting at the short edge of the panel with folded edges, topstitch the zip panel close to the edge (top left pic), and all the way down the long edge by the zipper until you reach the raw edge of the panel by the closed end of the zipper (top right). Topstitch both sides.

Take your 2" x 3" strip of fabric and press the 2" length in half and then press the raw edges on each side in towards your center crease, just as you did with your handles (bottom left pic). Slide the zipper end tab over the raw edge of the top zip panel, and topstitch into place (bottom right).

Baste Top Zip Panel to Bag


Attach Binding to Top Edge

Trim binding edge straight and fold back one end 1/2". Line the folded crease to the edge of the bag side on the exterior side (top left pic). Attach binding with 1/4" seam allowance - begin stitching at the folded crease/outside edge of the bag (top right pic). When you reach the end of the bag, backstitch in place and trim your binding with an extra 1/2" length at the end. Don't forget the extra length or your binding will have a raw edge on one end. (Let me be the cautionary tale: this happened to me when I was on autopilot and I had to seam rip and make a new piece binding.) Also, make sure to flip the handles down while stitching on the binding.

Fold the creased edge of the binding from the side in towards the bag (bottom left). This will give a finished edge on the outside of the bag. 

Fold down the top edge of the binding towards the exterior of the bag, gently tucking the folded raw edge of the binding underneath. Stitch into place by machine or hand.

And you are done!


Shabby Fabrics Coupon Code: ThreeOwls10 
Good for 10% off your entire purchase until 12/12/14. One use per customer. 

Monday, November 10, 2014

All the Fall Things

Trillium Designs Witchy Toes
One would think that being a quilter and crafter would mean a house full of handmade autumn decor and accessories, but my house is actually lacking. Most of my fall sewing revolves around making costumes my children wear for a maximum of three hours, dump into the dress up drawer, and promptly outgrow. When my now-12-year-old was one year old, she had a handmade sheep costume, complete with a fleecy hat that had ears and a chin strap. It turned out to be the hottest Halloween I can remember, so she didn't wear it. I never even took a picture of it. Ok, ok, I live in Texas and I knew it was a weather gamble.

I have dialed back on handmade costumes, but all the time I spend on Instagram watching creativity happen has had me itching to make some fun fall and Halloween items that can be used year after year. I resisted as long as I could because we are overflowing with holiday storage in the attic, but I can't help myself with the super adorable fabric lines like Spooktacular Too taunting me.

I saw my friend Gwen's version of Trillium Designs Witchy Toes, and I knew I had to make them! I have sewn quite a few paper pieced blocks and yet I was somehow surprised by the number of sections in this block. It took quite some time to label the pieces and piece them. I thought I might save some time by using striped fabric rather than piecing them. Ha ha. I didn't account for the time it would take to carefully line up my stripes because there are three seams on each side. I will say that I am so, so happy with how they lined up so nicely  - well worth the effort, but if I make this block again I will be sure to piece the stripes!

I really struggled with the back part of the shoes, particularly on the right side. I ripped that side and re-sewed once, but it still didn't line up properly. (watching The Vampire Diaries while I pieced probably didn't help matters) At that point, I reminded myself I was sewing a trick or treat bag for my six year old; she won't care! And is is still super cute. 

My 18 year old daughter helped me select the fabrics for the bag; she has such a good eye for mixing colors and prints. Eva picked the fabric to applique her name - Michael Miller mirror ball dots. The handle fabric, the DS Quilts orange dots, and the glittery bats fabric are all from Joann. The stripes are from Timeless Treasures and the buckle is purple MM mirror ball dots.

Witch Toes Halloween Trick or Treat Bag

This back of the trick or treat bag is Spooktacular Too Scaredy Cat. This fabric is my new Halloween obsession. I love, love, love the vintage feel to it and I want to sew everything using it. It is a large scale print, and I chose the bag dimension to fit every cat on the bag.

halloween trick or treat bag

To add a little bling to the inside of the bag, I used a glittery bat fabric I found at Joann. It's super cute!

Halloween trick or treat bag lining

Continuing the Halloween theme, I made a quick bottom zipped pillow cover. Rather than remove existing pillow covers from pillows on the sofas, I used one of the less attractive pillows that matches the sofa upholstery. The bottle fabric is my other favorite Spooktaculer Too fabric.

First Halloween pillow finish

I'd like to have an autumnal pillow on the sofa through Thanksgiving, so I cut into my precious Hadley fabric by Denyse Schmidt. Removing the blues from the bundle give this line a decidedly autumnal feel. This is the fastest pieced pillow I have ever made. I stacked my fat quarters four at a time, cut strips, and then subcut into 2.5" squares also stacked in groups of four. I tried not to get overly worked up about precise cutting and matching seams as I was cramming this project in between party preparation activities, but I was pleasantly surprised with the outcome.

Hadley patchwork

Denyse Schmidt Hadley autumn patchwork pillow top

Once I added two pillows to the sofa, I decided we needed a couple more - for a total of two Halloween pillows and two general autumn pillows. A cute foxy print from Joann Fabric and more Spooktacular cats.

Foxy pillow

                   Spooktacular cat pillow 

My daughter fell in love with the fox print fabric and made herself a little tote bag and pencil pouch.

Little fox tote bag and pencil pouch

I have been dying to make a modern maples quilt, but with so many projects I thought maybe a table runner for my formal dining room would be a better project. I absolutely love my blocks, but my background fabric is too white for the rich tones of my dining room. I think I need to seam rip and make something else out of my four blocks, but I have since moved on to Christmas sewing and my modern maples are folded in a closet.

Modern maples top

Untitled

Wednesday, October 29, 2014

Sew on the Go Bag Pattern Tips


Several weeks ago, I made an Instagram friend an Amy Butler Weekender Travel Bag using Fig Tree & Co. Somerset fabric line. She asked if I could make her a companion Sew on the Go Bag by Cotton Way. This week I was finally able to sit down with the pattern and give it a try. I am a very visual person, and it took me some time to work through the construction of this bag, particularly how the top lining/bindng is assembled. The design of the Sew on the Go Bag is very clever, but not intuitive for me based on how I have previously assembled bags with a top panel and binding (or in this case, a faux binding).

I spent some time fiddling with pieces and looking at Bonnie's blog post pics. Along the way, I made some notes and took some pictures of the trickier pattern sections for future construction efforts. I don't know about you, but sometimes I forget the process if I don't make a pattern again for months. I am sharing my notes and pics for other visual learners. This is a long and pic heavy post, so sorry in advance.

The pattern features a front panel that unzips to lay flat and stores scissors and thread on ribbon. The front pocket panel behind the zippers is vinyl so you can see and store various items. I love this feature - so clever. On each side of the center pocket, there is a narrow pockets to store flat items such as rulers.

Patchwork center:
I opted to do patchwork on the center of the pocket panel, I used 2.5" mini charms - 3 across x 8 down, pieced and trimmed down to the size specified in the pattern. I recommend that you lock your exterior top and bottom row seams with a backstitch after trimming, as you will be turning the piece inside out and back again when you are adding zippers, and the seams can come undone.

Interfacing:
The pattern calls for white fleece or batting between the front and back of the pocket panels, and behind the exterior pieces. I used batting for all the pieces, and only quilted the main panel. For the pockets, I simply fused the batting to the back and left them plain. The front pocket is a bit heavy once you add zippers and vinyl. I think in the future, I will add interfacing to the back of my main panels prior to adding the batting...because I love to interface the heck out of everything.

I used shape flex SF101 interfacing on the handles rather than white fabric.

Pocket zippers:
Adding zippers was the first tricky step I came to. It really wasn't terribly difficult because I have sewn a fair number of zippers, but I had to play with the pieces to figure out how to sandwich the zipper between the top and bottom half of the pocket pieces.

You first attach zippers to each side of the center panel. The center panel piece is twice as long as the height of the pocket because it folds down at the top to make the backside pocket lining. I folded my long pocket pieces with right sides together and pressed a crease to find where to position the top of the zipper. It is easiest to baste the zipper to one half of the panel exterior, fold down the second half over the zipper top, and stitch with 1/4" seam (use a zipper foot).

I turned my zipper so that the pull faced the batted side of the pocket, which I wanted on the outside of the pocket (It isn't really necessary or important, but I like to be consistent.). On the first side, I laid my zipper face down on right side edge of the the exterior panel, sliding the zipper pull down to keep it out of the way. In the pic below, I had not yet pulled the top edge of the zipper tape out of the way, but there is another pic that shows it later on. Pull the extra tape at the top of the zipper to the outside, with the metal top of the zipper up by the folded top crease, but still 1/4" away from the outside edge of the fabric. This is where basting the first side comes in handy, so you can see what you are doing there. Repeat the process on the second side. Make sure your zipper tabs are facing the same direction on both sides. Once you have attached both zippers, flip the center panel right side out and press it.

After attaching zippers to each side of the center panel, you attach side panel to each zipper. I opened my zipper tape to keep the zipper foot out of the way. In the pic below, I was attaching the left side pocket panel with the lining side of the pocket facing up and the zipper facing down. You can see in the top pic below that I have the zipper tape positioned so that the metal at the top is up to the crease in the pocket panel fold. The bottom pic shows how to pull the zipper tape at the top out of the way, and to fold the other half of the pocket panel over the zipper tape. Stitch 1/4" and fold the side panel to right side out.

*You can also see in the pic that I pinned the ribbons and scissors so they wouldn't move and get caught in the zipper seams. 

Right side attachment:

I don't recall if the pattern specifies, but I basted my vinyl pocket on one main panel, and then basted my completed pocket panel on top of that to keep all of the layers together nicely. 

From there, assembling the basic structure of the exterior, lining, and top zip panel was like other bags. However, attaching the zip panel to the lining felt very confusing at first. It took me some time to work it out, but now it makes sense. With your lining facing right side in, face your completed top zip panel right side up. Pin or clip all around the top, matching side seams, and sew together with 1/4" seam allowance. This is what it looks like after you stitch them together:

Then you will attach your lining with the attached top zip panel to the exterior of the bag. It looks pretty crazy when you insert the exterior into the interior (see pic below); it doesn't look like it will work, but it does. Keep your lining fabric turned with the right side in just as it was when you finished attaching your zip panel. The zip panel is facing up. The lining piece that is attached to the sides of the zipper (the red fabric here) is what you will attach to the top edge of the exterior of your bag. Make sure the actual zipper and the panel around it (the green fabric here), is pushed down out of the way. 

Matching side seams, work your way around the bag, pinning or clipping the exterior of the lining. It will look like this when you are done. Attach with 1/4" seam allowance.

Hopefully you left an opening in the bottom lining of your bag to turn everything right side out. It will look like this:

The pattern calls for stitching each side of the handles down with one short seam and adding the rest of the handle detail at this step. Oh my word, this was fiddly and made me sweat because you have to open the hole in the bottom of your lining to make a space to stitch down the handles to the exterior panel only, and not the lining fabric. In the future, I think I will make my lining opening larger than 5-6" to give myself more room to maneuver. These handles are not my best handles ever, but it's ok - it's a learning process. 

The faux binding (my term for it, but surely not the actual technical term) on this bag is really genius. It saves a lot of time and looks pretty good. To make this lining/binding, you just allow the lining fabric to show 1/4" on the exterior of the bag. It is really easy to just eyeball it because the seam you use to attach the lining to the exterior is 1/4", so if you have that top seam facing straight up, you just roll the lining fabric back down behind it and 1/4" will naturally show on the front. Wonder clips work great to hold the fabric in place.

When I machine bind, I really like to use my walking foot to help keep my stitches straight. I switched to the walking foot, and stitched the lining/binding down in the ditch on the front.

You can see how the top lining/binding stitches look on the backside in the pic below. I didn't really know what to do with the side lining seams (red fabric) that peeked out on the interior of the bag, so I flipped up the raw edges and hand stitched them to the lining to hide them and keep that piece of fabric in place.

Attaching the snaps and button were relatively quick, but I think next time I will attach the snap to the center pocket before I attach the zippers.

My finished product is nowhere near perfect, but I love to try new techniques, and learned a lot along the way.


And a pic of the companion Weekender Travel Bag:

Somerset Weekender Travel Bag