Showing posts with label paper piecing. Show all posts

Monday, September 7, 2015

Minis, minis, minis


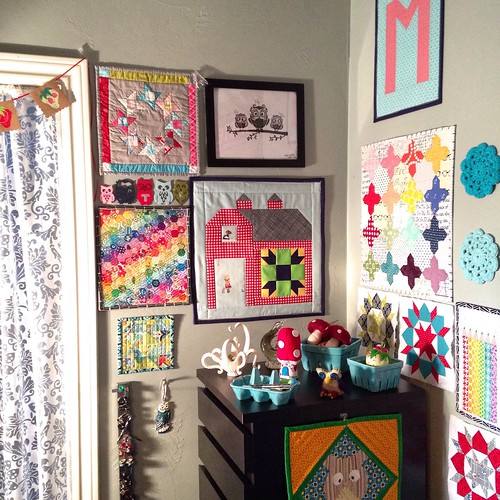
My sewing space consists of a small corner of our multipurpose game room. Even so, my little corner of mini quilts has been a slow, evolving work in progress. I have a lot of mini quilts from various quilting friends and swaps, and a few minis I have made as well.

A month or so ago, I finally made a little mini I have had on my mind for a long time. I grew up a huge Star Trek fan, especially Next Generation. "Make it Sew" gives a nod to two of my favorite things. I used the foundation paper pieced pattern called My First Alphabet by From Blank Pages. Fabric is a mix of Bonnie and Camille lines on Vintage Modern low volume dots with Tasha Noel Vintage Market navy binding. Let's just pretend that the word "sew" is perfectly centered, or let's call it jaunty.


I originally had it hung in the top left of my sewing corner, but it was too narrow for the space. I decided to move it, and wanted to fill the space left. My quilting friend Ellyn and I decided to do a little mini quilt swap for our respective sewing areas. I was pretty excited about it; Ellyn and I are kindred spirits and I love her work. I was also happy to have a small, short time period swap with no pressure of extras. 

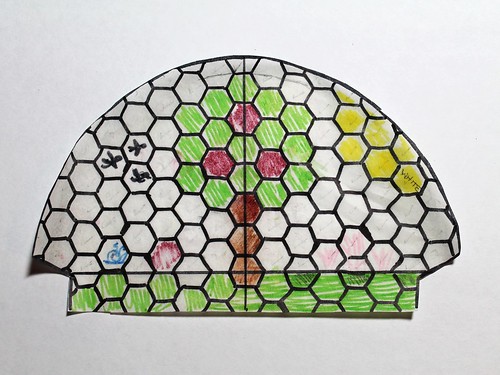
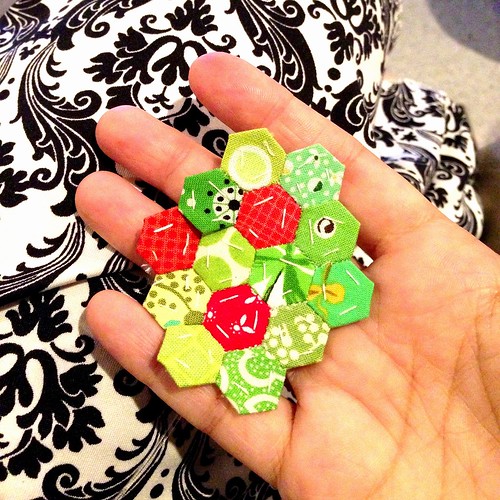
I have been eyeballing CraftyPod's free Cover Girl Rosette Pattern (from the cover of her book on English Paper Piecing called All Points Patchwork). I decided to make four blocks and applique them onto a netural background. Ellyn's only space requirement was to keep the quilt width at 16" or less. To accommodate Ellyn's wall space, I scaled the pattern down to 85%. I am disappointed that I didn't take any decent photos of the blocks as I made them. I didn't set out to fussy cut Bonnie and Camille scallops for each block, but after I did one it just seemed to be the natural progression of things. I love the effect. 


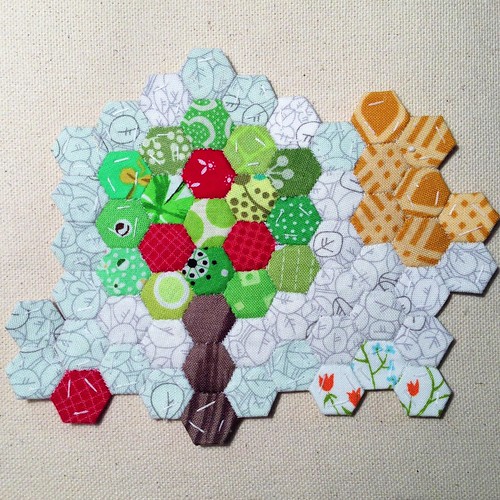
I hand appliqued each block onto a Carolyn Friedlander botanics low volume print. Sorry it is so hard to see in my too-bright pic. Placement of the blocks was interesting. I creased the center and halfway from the center to the edge, measured where each block should be to line up, and then made little dots at where each point should line up with water soluble marker. You can see creases and dots a bit in the pic below. I have no idea if this is a good or goofy way to line it all up, but the end result worked out fine. I tried doing the applique in a hoop, but that mostly annoyed me. I appliqued the last three without a hoop.


I was able to use my new custom rubber stamp on a twill label. 


Ellyn made me an awesome Thimble Blossoms Picadilly Circus dresden plate using Hello Darling (my current fabric line obsession) mini with paper pieced "Create" underneath. I love to have quilty messages on my wall, along with super bright and scrappy fabric. I also requested a bit of an odd size to fit the hole in my space. She nailed it! I love how the orange background makes the dresden plate and "create" pop.


Monday, March 30, 2015

Vintage Candy Cottage Pattern


I drafted a pattern for a holiday pillow swap a while back, and I added extra pattern pieces which can be substituted to make the pattern with a year round theme. The Vintage Candy Cottage pattern was once available to purchase on Craftsy, but I now have it available on Payhip. I dusted off my pattern this month to make a pillow for a friend. I used some of my favorite Tasha Noel fabric for the house and border, and quilted with 1/2" diagonal crosshatching and Miss  Kate red and white scallops for the binding. Pillow finishes at 20" square.


The original Vintage Candy Cottage pillow I made for a holiday swap adds candy canes to the yard and wreaths to the windows, along with a patchwork border.


I made a spring mini quilt for a friend last year with 1/4" crosshatch quilting and also using my favorite Tashe Noel floral, this time in aqua for the background.


At some point I would like to make myself a mini to hang in my sewing room, but I have many other things planned before I get there.

Thursday, February 12, 2015

Rainbow Hexie Mini and EPP Finishes

Rainbow Hexie Mini - 10" x 12" using 1/2" hexagons 

I posted last month about the rainbow (plus pink) mini quilt I was working on, using 1/2" hexies. I haven't been sewing as much this year as I try to reclaim an organized craft and home space, but I managed to finish the quilt a couple of weeks ago.I am so happy with this little quilt. It finished at approximately 10" x 12", which is the perfect size for the wall in my little sewing corner. 

I taped it up on my wall temporarily, but as of yesterday, it has been removed along with all the other minis while I reconfigure the wall space after adding a fresh coat of paint to the room.

Happy little corner

I dusted off a 36 degree diamond WIP with Lecien Flower Sugar 2013 that had been languishing in my closet drawer for over a year. I was not pleased with my center points (these diamond points are sharp and I tried to be clever when I pieced them - to my detriment), but with the addition of a center circle applique, I found a way to love and finish this project.

I hand appliqued the diamonds to Carolyn Friedlander's Architextures scribble fabric while watching the Super Bowl, straight line quilted, and made a 20" pillow with covered zipper back. It fits in perfectly with the other pillows on the sofa. Stay tuned - there will be many pillows made this year.

Diamond EPP pillow

My final recent EPP finish is a little hexagon heart pillow. I thought this would be a fun way to continue moving through some of the 1/2"hexies I basted from my scraps. I hand appliqued the heart to Riley Blake Le Creme Swiss Dots (one of my favorites!), did some easy straight line quilting, and added a covered zipper back. This little pillow finishes at 10" square.

Quilted Heart Hexagon Pillow

Quilted Heart Hexagon Pillow

Heart Hexies

Pillow back - covered zipper

Well, I suppose I appear to be doing a little sewing lately. I'll have a separate post on a project that took a week or so from quilting...

Monday, November 10, 2014

All the Fall Things

Trillium Designs Witchy Toes
One would think that being a quilter and crafter would mean a house full of handmade autumn decor and accessories, but my house is actually lacking. Most of my fall sewing revolves around making costumes my children wear for a maximum of three hours, dump into the dress up drawer, and promptly outgrow. When my now-12-year-old was one year old, she had a handmade sheep costume, complete with a fleecy hat that had ears and a chin strap. It turned out to be the hottest Halloween I can remember, so she didn't wear it. I never even took a picture of it. Ok, ok, I live in Texas and I knew it was a weather gamble.

I have dialed back on handmade costumes, but all the time I spend on Instagram watching creativity happen has had me itching to make some fun fall and Halloween items that can be used year after year. I resisted as long as I could because we are overflowing with holiday storage in the attic, but I can't help myself with the super adorable fabric lines like Spooktacular Too taunting me.

I saw my friend Gwen's version of Trillium Designs Witchy Toes, and I knew I had to make them! I have sewn quite a few paper pieced blocks and yet I was somehow surprised by the number of sections in this block. It took quite some time to label the pieces and piece them. I thought I might save some time by using striped fabric rather than piecing them. Ha ha. I didn't account for the time it would take to carefully line up my stripes because there are three seams on each side. I will say that I am so, so happy with how they lined up so nicely  - well worth the effort, but if I make this block again I will be sure to piece the stripes!

I really struggled with the back part of the shoes, particularly on the right side. I ripped that side and re-sewed once, but it still didn't line up properly. (watching The Vampire Diaries while I pieced probably didn't help matters) At that point, I reminded myself I was sewing a trick or treat bag for my six year old; she won't care! And is is still super cute. 

My 18 year old daughter helped me select the fabrics for the bag; she has such a good eye for mixing colors and prints. Eva picked the fabric to applique her name - Michael Miller mirror ball dots. The handle fabric, the DS Quilts orange dots, and the glittery bats fabric are all from Joann. The stripes are from Timeless Treasures and the buckle is purple MM mirror ball dots.

Witch Toes Halloween Trick or Treat Bag

This back of the trick or treat bag is Spooktacular Too Scaredy Cat. This fabric is my new Halloween obsession. I love, love, love the vintage feel to it and I want to sew everything using it. It is a large scale print, and I chose the bag dimension to fit every cat on the bag.

halloween trick or treat bag

To add a little bling to the inside of the bag, I used a glittery bat fabric I found at Joann. It's super cute!

Halloween trick or treat bag lining

Continuing the Halloween theme, I made a quick bottom zipped pillow cover. Rather than remove existing pillow covers from pillows on the sofas, I used one of the less attractive pillows that matches the sofa upholstery. The bottle fabric is my other favorite Spooktaculer Too fabric.

First Halloween pillow finish

I'd like to have an autumnal pillow on the sofa through Thanksgiving, so I cut into my precious Hadley fabric by Denyse Schmidt. Removing the blues from the bundle give this line a decidedly autumnal feel. This is the fastest pieced pillow I have ever made. I stacked my fat quarters four at a time, cut strips, and then subcut into 2.5" squares also stacked in groups of four. I tried not to get overly worked up about precise cutting and matching seams as I was cramming this project in between party preparation activities, but I was pleasantly surprised with the outcome.

Hadley patchwork

Denyse Schmidt Hadley autumn patchwork pillow top

Once I added two pillows to the sofa, I decided we needed a couple more - for a total of two Halloween pillows and two general autumn pillows. A cute foxy print from Joann Fabric and more Spooktacular cats.

Foxy pillow

                   Spooktacular cat pillow 

My daughter fell in love with the fox print fabric and made herself a little tote bag and pencil pouch.

Little fox tote bag and pencil pouch

I have been dying to make a modern maples quilt, but with so many projects I thought maybe a table runner for my formal dining room would be a better project. I absolutely love my blocks, but my background fabric is too white for the rich tones of my dining room. I think I need to seam rip and make something else out of my four blocks, but I have since moved on to Christmas sewing and my modern maples are folded in a closet.

Modern maples top

Untitled

Sunday, September 21, 2014

Hexie Apple Dumpling Pouch and Other Apple Goodies

I love swapping - there is little as satisfying as creating for another quilter. Some of my favorite creations have come from swapping, so when I saw Mari-Ann (Rockislander) was hosting a Dumpling Pouch swap with an apple theme, I immediately signed up. The secret swap called for using Michelle Patterns free pattern, the dumpling pouch, and filling it with goodies.

Once I received my partner assignment, Mari-Ann herself, I spent a day kind of staring at the wall waiting for inspiration on how to make a little pouch have big impact, and then it hit me that hexies could be made to look like apples. (I think I've mentioned how much I love tiny piecing - and hexagons.) I wasn't sure if it was a good idea at first, but I ended up loving it.

Apple dumpling pouch swap

Apple dumpling pouch swap

I used the free hexagons design sheets on the Paper Pieces site  to draw up some little apple shapes and a little scene with an apple tree and sun.


Once I was convinced that hexie apples would work, It traced the dumpling pattern with tracing paper and also used a free 1/4" hexagon sheet to trace the hexagon shapes onto the traced pattern piece. I drew a line down the center of the pattern piece to align the tree, and drew a horizontal line where the bottom of the bag folded. This really helped me to see if the tree would fit and to plan how many hexies to baste. The scene transformed as new ideas developed.

Apple Dumpling Swap Diagram

Then I commenced digging through my scrap bin to find small scale fabrics that matched the theme and my partner's likes. Lots of basting and hand stitching.

Preseason football & Dumpling Swap EPP

For the background I chose Carolyn Friedlander's Botanics low volume leaves. She designs my favorite low volume fabrics; they are subtle enough to blend into the background when they need to, but still provide organic visual stimulation. Luckily, my partner is also a fan. Alison Glass gold sun print streamers felt very much like sunshine. My partner likes Heather Ross, so I added Far Far Away reprint flowers in white, and on bottom fussy cut the flowery meadow around the unicorn print to create a grassy border. My two favorite touches are the Far Far Away snail I fused and hand appliqued on the bottom, and the Violet Craft Waterfront Park bird hexies. 

I've committed to my dumpling swap idea

Untitled

I set the pouch project aside for a couple of weeks, waiting for inspiration for the reverse side panel. I wanted to keep with the hexie apple theme, but on a larger scale. I hand appliqued a 1.5" hexagon using a hexagon print red fabric, and added an embroidered wool felt stem and leaf, and a sewed a simple running stitch around the hexie. On the tiny hexie side, I added embroidered details in lieu of quilting. I embroidered rays of sunshine, apple stems, a leaf and shiny spot on the fallen apple, a little snail slime trail, and a simple green running stitch around the tree leaves. I won't win any awards for my embroidery, but it turned out pretty cute.

Apple dumpling pouch quilted exterior panel

This was the point where construction got a bit tricky. I cut square shapes to baste my hexies and there were so many little seams, so it was quite bulky. I knew I would have my scene wrapping around to the bottom of the pouch a bit, but I ended up losing a good 1/4" more than I anticipated, as I had to box my corners deeper to account for the bulk. It still worked out, but just not 100% as envisioned.

The pattern calls for hand basting the zipper twice, and it took a long time, but it did make the zipper very easy to attach.

For the pouch lining, I used Sandi Henderson's Farmer's Market apples. I love this print because it is green, has apples, and it isn't directional in a way that requires two panels.

Apple dumpling pouch interior

My almost 12 year old daughter makes the cutest polymer clay creations, and she was kind enough to make an apple waffle clay zipper charm. It turned out so cute!

Apple Dumpling Pouch

Once I finished the pouch, I moved on to making a little extra goodie. I found a free paper pieced apple pattern online, added a notched bottom to it, and used more of the red hexie fabric. I then experimented with my Nova Tote Pattern to make a small size. I don't know what I was thinking when I did my math, but my proportions are off - I'll work more on adjusting that later. Even so, I still really like it. I used an H&M duvet for the lining fabric, an Alexander Henry crosshatch binding, and some red and white chevron canvas I have had in my closet for ages.

Small Nova Tote with apple quilt block pocket

While I was in the apple making mood, I made a little apple coaster for another friend using the super adorable apple pattern in the book Playful Little Paper-Pieced Projects: 37 Graphic Designs and Tips from Top Modern Quilters. I loved making this little block.

Apple coaster

These little apple projects were so much fun to make, and I am ready for apple season now.

Thursday, September 11, 2014

My Weekender Travel Bag Adventure

I have had many quilting friends ask me about how I constructed the Amy Butler Weekender Travel Bag that I made for myself at the end of June. The standard bag pattern calls for home decor weight fabric, interfacing, and peltex, but there are so many different pieced and quilted versions out there. There are also enough blog posts about tweaks people have made to this pattern that this may be somewhat redundant, but I didn't really see any one post that fit exactly what I envisioned construction-wise.

First and foremost, I wanted a sturdy, structured bag that would still hold its shape when stuffed completely full. I also wanted batting and quilting on the exterior, but didn't want to break needles due to thickness over interfacing and Peltex. I wanted to incorporate my favorite things into the theme of my bag and some of my favorite fabrics. I am pretty proud of my bag. I love how it looks, and I love that it is so sturdy. I also managed to avoid breaking any needles, so I feel like I was able to manipulate the thickness to keep it from getting overwhelming.

(Sorry in advance for the LONG post)

I am positively obsessed with English paper piecing hexies, scrappiness, and tiny piecing, so 1/2" hexies from 250ish fabrics seemed like a natural choice for one of the main pocket panels. The hexagons were all hand pieced, either while in front of the TV (thank you, season 2 of Orange is the New Black) or sitting poolside.

How I cut and sew my hexies - If I am cutting from my stash, I make a hexagon template with 3/8" seam allowance. I prefer a hexagon shape for anything larger than 1/4" hexies because I don't like the bulk or fabric waste of squares. I then scissor cut the fabric - a quick way to plow through a lot of fabric in a short period of time, and this works well for my fussy-ish cutting - I kind of cut out what I want on the hexie, but if it shifts a bit, that is ok. I wouldn't recommend this method if you want precise fussy cuts. Stitching - I will change up my stitch style when my hands get tired, but most often I use a tiny whip stitch. 


I also wanted to have a main pocket panel with tools of the quilting trade and added a Thimble Blossoms Mini Spool  paper pieced scissors and sewing machine. The hexie flowers are 1/4", hand pieced, and hand appliqued. 


On one side pocket panel, I used a Spell it with Moda M to boldly declare the bag as mine, and inserted a tiny 2” double star inside. 


On the other pocket side, I used Kate Spain’s In from the Cold quilt pattern to make a little kawaii mug because I love tea and coffee.


   Construction Notes
  • Main body fabric: Alexander Henry farmdale blossoms - one of my most treasured fabrics
  • Pocket panel background fabric:my favorite low volume - Carolyn Friedlander Architextures trees
  • Cording and straps: Bonnie and Camille April Showers navy floral. I am obsessed with this fabric and use it for everything
  • Zipper: a light gray 30" non-separating zipper I found at Joann - it is really hard to find a wide variety of zipper colors in this length. I used EZ Steam II to baste the zipper in place before stitching it down. 
  • Needle: I switched to a heavyweight denim needle when I started assembling the bag pieces.
  • Straps: My straps are completely different from the pattern. I constructed my straps using 6" x 52" quilting weight fabric. I pressed the fabric on each side in half to the center, and then in half again. I then inserted 1.25" cotton webbing into the straps and topstitched both sides. I love the width and the heavy duty feel, without the stiffness of Peltex. This length works perfect for me to carry my bag over my shoulder. (Way down at the bottom of the page I have included a pic of me carrying my bag on my shoulder). Also, there is a pic below showing how I sewed the straps to the main panels.) To hold the straps into position to sew them to the panel panels, I used a wonder clip on each side at the top and the bottom.
  • Lining: I used a heavyweight oxford cotton for the lining. If I had used a quilting weight, I would have interfaced with Pellon Shape Flex (SF101) - my favorite bag interfacing.
  • Interior pockets: pics below of interior divided pocket and 9" zip pocket. (The pattern does not include interior pockets.)
  • Outside side pocket construction: pieced quilt block quilted onto batting. Lining of the pocket is quilting weight cotton (not interfaced)
  • Main pocket panel construction: on the hand pieced hexagons, I added sheerweight interfacing to the back of the hexagons to add stability. Both sides have batting and then are quilted every 1/4". Pocket lining is not interfaced. To line up my quilt blocks, I did a little math about what size blocks would work, and I cut the pattern piece out on waxed paper to lay over the fabric, so I could figure out how many hexagons I needed, and to trim my sashing on the pieced side.
  • Main panels: Quilting weight cotton, quilt batting, with Peltex behind it. I cut the main panel out using the pattern piece. I cut the Peltex out in the same shape, 1/2" smaller, as the pattern recommends. I marked the centers of the main panel and the Peltex to help line them up.. The batting was larger than the Peltex and the exterior to allow for quilting. I spray basted the batting onto the exterior fabric. The Peltex needed to be centered so that it was not in the seam allowances. I held the layers up to a window and used the light coming through the window to position the Peltex, and  then I spray basted it on as well. I quilted through all the layers. Peltex works great quilted behind batting. This also keeps the Peltex in place without any bowing. (See pic below)
  • Top/bottom panels: Quilting weight cotton quilted onto batting. No interfacing.
  • Cording: I don't have a piping foot, so I used EZ Steam II and fused the fabric around 6/32" cording. It took approximately forever to do, but I sat in front of the TV with a small pressing pad and watched TV while I did it. I also used EZ Steam II to fuse the prepared cording to the main panels before sewing the layers together. It was really nice to avoid basting stitches, but again, such a slow process.
  • Bottom and bottom insert: I followed the pattern on this, and I love the result. The bag doesn't bow on bottom even when it is stuffed to the top.
  • Assembling the panels: I skipped using pins and used Clover wonder clips. I used my walking foot to attach. I prematurely high-fived myself after attaching the top/bottom panel to the first main panel; it is attaching the second panel that is tricky at the corners. I had one corner that I had to seam rip four or five times before I was finally satisfied with it.

I machine quilted the entire exterior, including the bottom panel, every ¼”


The weekender bag pattern does not include interior pockets, so I added a 9” zipper pocket on one side, and a divided pocket on the other side. The divided pocket panel is the same height as the exterior pockets and sewn down the center vertically.


You can actually see where I bled on the lining fabric while hand stitching the lining to the exterior. Oxford cotton lining was HARD to hand sew. My poor fingers, but well worth the end result (and a little Oxiclean removed the stain).


Strap stitching - I sewed it down every which way - these straps aren't going anywhere! You can also see how the Peltex is positioned behind the batting and quilted.


Fusing the zipper in place:


It took me a couple of weeks to piece, quilt, and assemble my weekender bag. I can't decide which side is my favorite; they are all perfectly me. My bag worked very well on our trip, even stuffed to the top (all of that interfacing paid off!).