Tuesday, November 15, 2016

Craft Room Pegboard Organizer


Quilting is such a tool and supply intensive hobby and I don't have my own dedicated space. I have a small sewing corner in the game room/family office and storage is a massive problem for me. My supplies are sprinkled throughout the house, and a lot of my tools sit on my sewing table where they should theoretically  be right at hand to use. The problem is that I am constantly battling piles and tossing them about in my space. When Sports Authority closed over the summer, I asked my daughter to bring home some pegboards, thinking I might use them on the big game closet doors, but the smallest of the four pegboards she brought was 40" x 46.5". Then I had a revelation - I could move the print behind my desk to another room and install the pegboard behind my sewing table.

After months of contemplation and sporadic planning, I FINALLY tackled the project and I am thrilled with the results. I apologize in advance for the poor lighting. I live in cave and my photography skills are mediocre.

PEGBOARD SUPPLIES:

40" x 46.5" Pegboard (mine has 1/4" holes)
1" x 2" x 8' board cut into (2) 1" x 2" x 40" boards
Spray paint primer
Leftover Semi Gloss Paint - Sherwin Williams Dover White
Smooth foam roller
Leftover wall paint to paint 1 x 2 
Drill & long screws


PEGBOARD ACCESSORIES:


CONSTRUCTION AND PAINTING

I enlisted the help of my 8 year old and we painted the pegboard using a smooth foam roller to match our house trim. We also painted the 1 x 2 to match the wall color, but where the pegboard is hanging the 1 x 2 is not visible.


While the paint dried, we found the studs in the wall behind my table and marked them. It's a weird area with unpredictable distances between the studs because we closed a large doorway in that spot when we moved in. I figured out how high I wanted the top of the pegboard, marked the center, studs and out 19.5" on each side. 45" down I marked the center, studs, and outer edges. My husband drilled the 1 x 2s into the studs at the top and bottom. We then centered the pegboard over the boards and drilled into the 1 x 2 along the top and bottom.


ACCESSORIES:

I opened the pegboard hook assortment and just played around with the different hooks until I found what worked best for each item. 

Ledge:

I hung the IKEA MARIETORP ledge upside down so that the lip hangs down and doesn't obscure my little treasures and the holes for hanging are on the top and I used a longer straight hook through each pre-drilled hole to mount it. The best part is that this ledge cost only $5.99!


Planters as Buckets:
Really happy about this one because there are no handles and there are perfectly placed holes for hanging.

I filled the six SKURAR planters with:
Wonder clips
Pencils and fabric marking tools
Pens
Sharpie markers
Decorative scissors
Key fob and lanyard hardware

Have I mentioned that I am an avid collector of office supplies in addition to craft supplies?


Multiple tool holder and various tool hooks:

I used the multiple tool holder to store multiple types of scissors and shears, as well as the screwdriver I use to change out Juki sewing machine feet, and a backup seam ripper. Pliers holders store pinking shears and Gingher dressmakers shears. It is apparent that I own A LOT of scissors. And this is far from all of them.

Hooks store rotary cutter, pinking blade rotary cutter, key fob pliers, little snippers, hold punch, two strawberry pincushions made for me by my friend Gwen, a pincushion made for me by my friend Teal, measuring tape, elastics, twill tape, white chalk, blue chalk, seam gauge, Xacto knife.


The top of the pegboard houses cone thread, baker's twine, ribbon, perle cotton, embroidery hoops, washi tape, a hexie pincushion I received in a swap with Tracy Berrett of Quilter's Candy Box, Pouch with a View filled with 1/2" hexies, zippers, and various treasures including a Bonnie and Camille Ruby owl made by my talented friend Kelly and a 1960's fabulous pincushion that was my mom's.


The cleanest my corner has been in a long, long time.


Thursday, June 23, 2016

Weekender Bag Tips and Modifications - Part 3 - Completed Cotton + Steel Bag


And now for my 2016 Weekender Sew Along big bag reveal. That Sarah Watts - she is one of my favorite designers. I used her fabric all over this bag, with a little bit of fellow Cotton + Steel designer Melody Miller thrown in.

Previous Weekender Bag Posts

Part 1 - Planning and Piecing
Part 2 - Assembly


And obligatory pics with my Weekender Bag (now a little askew and crunched after multiple times under airplane seats).


Weekender Bag Tips and Modifications - Part 2 - Assembly


Last week I posted my first blog post as part of the Sewlux and Happy Little Cottage Weekender Bag Sew Along.

Previous Weekender Bag Posts


Today I am sharing a few assembly construction ideas that have worked well for me on the Weekender Bag.

Zipper:
I like to use Elmer's glue stick to hold down the 1" seam that you press down to install the zipper in the top panel. It helps keep it from flipping up.

I baste the zipper with Wonder Tape, but glue basting is super also.

Attaching piping:

Piping on pockets: 
When attach the pocket exterior and lining after the piping has been basted to the exterior, I find that the lining fabric shifts a lot. To help with this, I use Wonder Tape to hold the lining fabric in place.

Basting piping on main panels: 
I forgot to take a pic of this, but I like to use 1/4" Steam a Seam to hold the piping in place on the main panels. I iron as I go around the perimeter and it holds very well. I could use Wonder Tape, but Wonder Tape doesn't stick strongly and I don't want the piping to come up. Sewing in place works as well, but if I am pinning in place already, I figure I can just iron the piping with Steam a Seam.

Basting piping around the corners: 
On my first two bags, I really struggled with piping getting eaten in the bottom corner curves when I sew the main panel to the middle. A lot of frustration and seam ripping and still less than perfect result. This time it occurred to me that I can cheat the corners a little bit when I baste the piping in place and have an easier time at the sewing machine. IT WORKED PERFECTLY. I am beyond ecstatic about it.


NOTE: See below for what it looks like with my little ruler over the basted corner. When I set my ruler on top, the edge of the ruler hits right at the piping, and the 1/2" mark on the ruler is at the edge of the bag. This cheating corners method will not work if you place the piping farther in.


Here is the end result on the finished bag:


Attaching the main panel to the middle:

Wonder Clips:
Your best friend; use them liberally. Also make sure to mark centers of all your panels and line the centers up and work out from there.


Clipping the bottom corners of the middle:
This part was fiddly with the batted, quilted, duck canvas bottom and stiff Peltex (one layer, cut smaller than seams but still stiff and harder to maneuver. Two additional layers inserted in the bottom of the bag). That seam and poky seam allowance where the top panel attaches to the bottom panel, tripped me up on the first side. 

I had a light bulb moment on the second side and it went on much easier. I trimmed the seam allowance and it was able to lay nice and flat around the curve. Hopefully this collage shows the detail well enough for you to see.


Stitching the main panel to the middle:
This time I tried going around the machine with 1/4" seam first. I saw that on a blog post some time ago and I can't remember where. It is a great tip! It helps hold all the layers together. I ditched my walking foot on this bag because it was not handling all the layers under it; I tried using it on the first side and it was awful. I also had to use a bit heavier thread than Aurifil 50 wt. I switched to Gutermann cotton thread, which I just discovered you can find in cones at Joann online. Yay!


I used my zipper foot to do the 1/2" seam - it worked great this time to get close to the piping and over all the layers, and I don't remember why I didn't use it the first two times.


Hand Sewing the Lining:

Interfacing:
If there is one do-over I want on this bag, it is to go back and not be lazy about adding interfacing to the top panel lining pieces. (The second is not trying a machine stitched lining attachment which sounds so much easier.) It was stretchier than the main panels and I ended up having to add some little pleats at the top corners. My lining also didn't lay nice around the zipper ends when stitched in. My daughter said she doesn't care so I am just not going to look too closely at it.

Clipping or pinning lining to exterior:
Before any stitching, I like to flip back the top edge and wonder clip all the sides and top and then use straight pins to hold the lining top/main panel seams in place with the exterior seams.


Then I ladder stitch the lining fold to the zipper tape.


Attaching the lining seams to the exterior:
For this bag, I tried something new and I like it a lot. I bring my needle and thread through the seam between lining top panel and main panel and out to the bag exterior between the piping and bag. I do four or so stitches in several places and it holds the lining up nicely.


I think those are the highlights of my assembly method. I will edit and add if I realize I forgot anything. Also take a peek at the Instagram #wbsa2016 hashtag and #threeowlsweekenderbag for more details and ideas. 


Wednesday, June 15, 2016

Weekender Bag Tips and Modifications - Part 1 - Planning and Piecing


There are so many blog posts out there about the Amy Butler Weekender Bag pattern. When I decided to make my first one two years ago, I was overwhelmed by all of the blog posts and finally just decided to work through modifications on my own. I am on my third bag joining up with the Weekender Bag Sew Along hosted by Sewlux and Happy Little Cottage, and I am trying some new techniques. Chrissy from Sewlux has a ton of really great tips on her blog and has made some stellar bags.

I tend to use my blog to earmark how I make things so that I can remember down the line. I made lengthy handwritten notes with my first bag and typed them up into a lengthy blog post. It was pretty helpful for the second bag I made and to reference this time around as well. But I also blog to give more detailed info and everything in one spot for people who are interested. If you are on Instagram, you can take a peek at the hashtag where I posted the evolution of each bag #threeowlsweekenderbag and the 2016 Weekender Bag Sew Along hashtag where there are so many creative people joining to to make this crazy bag that allows for a million modifications - #wbsa2016. I am moving way ahead due to multiple obligations next month as well as needing to clear out the piles of cut pieces and supplies.


It was pretty ridiculous. All those 1/2" hexies and multiple quilt blocks.Here it is:


I am making this third bag for my oldest daughter and I wanted to make something cool, but not as complex. I also wanted to try and use duck canvas behind batting rather than my Peltex behind batting method.

Planning:

All Cotton + Steel fabrics - mostly Tokyo train ride and some Melody Miller

Piping and straps - c+s navy sprinkle counting stars

NOTE ABOUT PIPING AND STRAPS:
I buy one yard to make bias cut piping for this bag with some leftover, but it makes nice long strips that have less joins. Since I used the same fabric for straps, I bought 1.5 yards. See below for cutting straps.

Piping made using piping foot not the Steam A Seam method this time (takes forever!)
I think I would also be willing to try glue basting with Elmer's. I love Elmer's Glue Stick for sewing so much that I buy it in bulk.

Quilted 1/4"ish with batting on entire exterior

Duck canvas behind batting for main panels, top panels, bottom panel

Top panel and main panels: Quilted but not pieced 

Main Panels:
No piecing
Main panel 1 - Melody Miller Bees
Main panel 2 - Tokyo Train Ride

Straps:
Lengthened 1.25" x 52" finished with 1.25" webbing inserted 
I cut the strips WOF and joined them with a diagonal seam
This is .25" narrower than my previous straps and I like it just as well.

Exterior Pockets:
No canvas - batting only
I don't think it is necessary and would be pretty bulky.

Main Pockets:
No canvas - batting only
Main pocket 1- Tokyo train ride canvas scene - no piecingMain pocket 2 - 2" finished patchwork

End Pockets:
No canvas - batting only
End pocket-mustard mustang
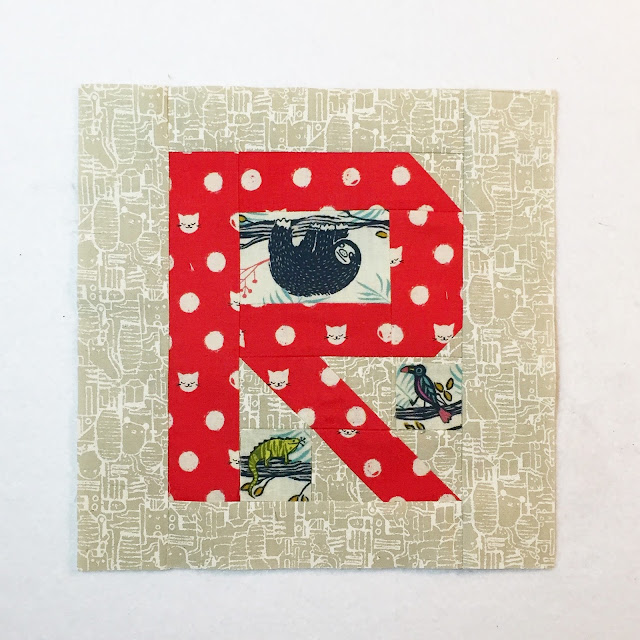
End pocket - first initial "R" using reduced size Spell it With Moda pattern (pic below)

Interior:
Interfaced with shape flex SF101Lined slip pocket on one side - using main pocket panel pattern piece, stitched down middle to make two slots. Cut one exterior and one lining, stitch across the top RST, turn right sides out and topstitch, baste to lining, stitch down the middle to make two slots.
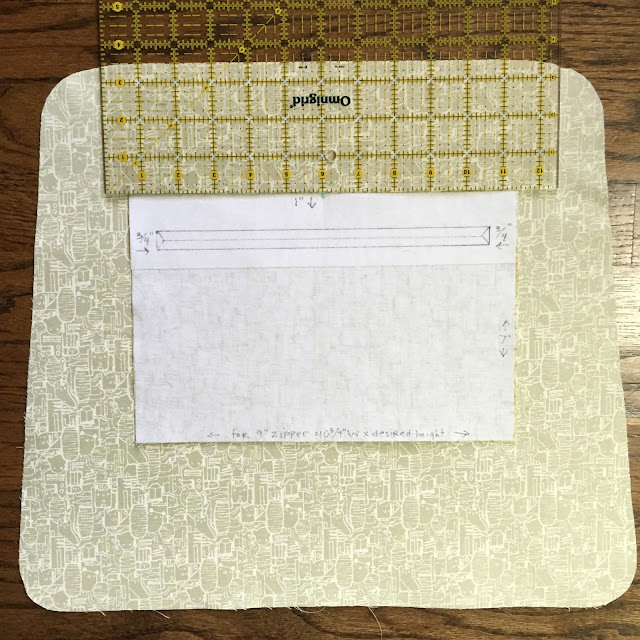
Inset pocket on other side with 9" zipper (see below for dimensions)

Bottom exterior:
Navy duck canvasOne layer of Peltex behind duck canvas bottom 1/2" smaller all around - both quilted to batting 

MAYBE two layers of Peltex to insert in bottom - adhere in place after bag exterior is completed using spray adhesive (because I am lazy and don't want to use the interfacing method. I'm also not convinced that this particular bag version needs it with the Peltex, canvas, and batting already on bottom.)

False bottom:
Same as pattern

Lining:
Hand stitched in same as pattern

Exterior zipper:
Separating Sport Zipper tacked on the separating end - it is hard to find 30" non-separating zippers

Prepping:

Most of the time when I make something, I like to bounce around between cutting and sewing. I don't really like to do that with the Weekender Bag though. I like to cut all of the pieces, then prep them, quilt, assemble.

I knew I wanted to use a lot of Tokyo Train Ride by Sarah Watts. I bought a lot of it and was gifted a nice selection of it, and my daughter loves it. I pulled a bunch of fabric and gathered supplies to start editing with her input. I also grabbed my bag so I could measure my interior zip pocket placement. I made my piping and straps before I did anything else.


Straps:

I attached using the same method I previously used and with webbing inserted instead of Peltex. I mark the top line as the pattern states and I sew across there and edgestitch all down the length of the straps on both sides and then sew an X at the top attachment even more stability. I usually just eyeball the X box, but using chalk to mark probably made for a better result.


Interior pockets:

Here are the particulars if you want a 9" pocket as well. So many tutorials for zipper pockets. I like this one.

Cut two rectangles 10.75" W x 7" H (not super deep but deep enough to fit some stuff without it getting lost).

Centered 3.5" from the top of the lining. Draw 1/2" tall rectangle 1" down and 3/4" in on each side.


Here is a pic of my pockets in very bad late night lighting:


Pieced main pockets:

I really like to use wax paper or freezer paper to help me plan out how much of what I need and what it looks like prior to stitching, especially since the pocket is angled. I was thinking 2" patchwork so I mocked it up on freezer paper. When I made my hexie pocket previously, I used wax paper cut the shape of the pocket to see how much to keep adding.

I know it took a few minutes, but by mocking up my patchwork pocket on freezer paper, I was able to quickly see how my pocket panel would look with mini charms centered and how to cheat around the edges that will be mostly hidden by the 1/2" seam allowance. 


Here is how I did it if you are interested in not using squares for the sides that will be covered:


(40) 2.5" squares - 8 across x 5 down
On each side: (2) 2.5" T x 1.5" W strips at the bottom 

and (1) 7" T x 1.5" W strip at the top (only about 6.5" needed so trimmed down after attaching). 


I pieced the squares first and then added the mishmash scrap on the sides after. The long strips will almost all be hidden in the seam allowance. 


(These measurements have some overage on all sides to quilt and then trim to size.) 


Quilting panels and then cutting to size - or not:

I couldn't easily go bigger on the size of the quilted panels when I did the method with 1/2" smaller Peltex behind the batting and I didn't do that on most of my panels here - I just cut my main panels with the pattern piece, basted, quilted, trimmed. I used my walking foot with the presser foot pressure super low and occasionally stitched from the opposite direction.

It might be a good idea to make the panels bigger, quilt, then cut down, because it can shrink up, but it worked fine three times, but please don't try it my way and get mad if it doesn't work - do at your own risk and stop if it is warping badly. LOL

I definitely cut using the top panel pattern piece and then quilted. The sheer amount of waste in my aqua Farmdale Blossoms with the first bag would have made me cry. I also fussy cut the Tokyo Train Ride print I used for this bag and it was easier to cut first. You have to be SO careful about basting this evenly though. I cut my batting and canvas nicely and used my 24" long acrylic ruler to help and spray basted it without a lot of stretching.


Quilting: 

I did my Ish Quilting - not exact. I love the texture, but densely quilting will add a million pounds to the weight of the bag. You can also see more of the straps and piping across the top of the main pocket as well.


End pocket:

I really love how this block turned out! My daughter LOVES sloths, but who doesn't?


Bottom Panel:

I wanted to sandwich the Peltex (cut 1" smaller, so 1/2" smaller all around so it doesn't get in the seams during bag construction). I layered canvas, then the Peltex with basting spray, then batting.

I'd also like to say that I added feet to the bottom of my first bag and it was a mistake. They weren't big enough and it was stupid and pointless, and I am still mad at myself. If you do it, buy some good size feet.


Ok, in my next post I will have my piping corner cheat that helped me avoid having my corners eaten in the bottom curves during assembly and some actual assembly tricks I figured out on this bag for an overall better effect. Well, for me anyway. There is no right or wrong, just what works best for each individual person. I hope to have that post up pretty soon. My bag exterior is done and just needs a lining. :)