Wednesday, October 29, 2014

Sew on the Go Bag Pattern Tips


Several weeks ago, I made an Instagram friend an Amy Butler Weekender Travel Bag using Fig Tree & Co. Somerset fabric line. She asked if I could make her a companion Sew on the Go Bag by Cotton Way. This week I was finally able to sit down with the pattern and give it a try. I am a very visual person, and it took me some time to work through the construction of this bag, particularly how the top lining/bindng is assembled. The design of the Sew on the Go Bag is very clever, but not intuitive for me based on how I have previously assembled bags with a top panel and binding (or in this case, a faux binding).

I spent some time fiddling with pieces and looking at Bonnie's blog post pics. Along the way, I made some notes and took some pictures of the trickier pattern sections for future construction efforts. I don't know about you, but sometimes I forget the process if I don't make a pattern again for months. I am sharing my notes and pics for other visual learners. This is a long and pic heavy post, so sorry in advance.

The pattern features a front panel that unzips to lay flat and stores scissors and thread on ribbon. The front pocket panel behind the zippers is vinyl so you can see and store various items. I love this feature - so clever. On each side of the center pocket, there is a narrow pockets to store flat items such as rulers.

Patchwork center:
I opted to do patchwork on the center of the pocket panel, I used 2.5" mini charms - 3 across x 8 down, pieced and trimmed down to the size specified in the pattern. I recommend that you lock your exterior top and bottom row seams with a backstitch after trimming, as you will be turning the piece inside out and back again when you are adding zippers, and the seams can come undone.

Interfacing:
The pattern calls for white fleece or batting between the front and back of the pocket panels, and behind the exterior pieces. I used batting for all the pieces, and only quilted the main panel. For the pockets, I simply fused the batting to the back and left them plain. The front pocket is a bit heavy once you add zippers and vinyl. I think in the future, I will add interfacing to the back of my main panels prior to adding the batting...because I love to interface the heck out of everything.

I used shape flex SF101 interfacing on the handles rather than white fabric.

Pocket zippers:
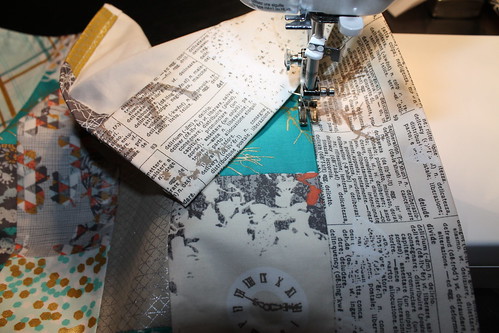
Adding zippers was the first tricky step I came to. It really wasn't terribly difficult because I have sewn a fair number of zippers, but I had to play with the pieces to figure out how to sandwich the zipper between the top and bottom half of the pocket pieces.

You first attach zippers to each side of the center panel. The center panel piece is twice as long as the height of the pocket because it folds down at the top to make the backside pocket lining. I folded my long pocket pieces with right sides together and pressed a crease to find where to position the top of the zipper. It is easiest to baste the zipper to one half of the panel exterior, fold down the second half over the zipper top, and stitch with 1/4" seam (use a zipper foot).

I turned my zipper so that the pull faced the batted side of the pocket, which I wanted on the outside of the pocket (It isn't really necessary or important, but I like to be consistent.). On the first side, I laid my zipper face down on right side edge of the the exterior panel, sliding the zipper pull down to keep it out of the way. In the pic below, I had not yet pulled the top edge of the zipper tape out of the way, but there is another pic that shows it later on. Pull the extra tape at the top of the zipper to the outside, with the metal top of the zipper up by the folded top crease, but still 1/4" away from the outside edge of the fabric. This is where basting the first side comes in handy, so you can see what you are doing there. Repeat the process on the second side. Make sure your zipper tabs are facing the same direction on both sides. Once you have attached both zippers, flip the center panel right side out and press it.

After attaching zippers to each side of the center panel, you attach side panel to each zipper. I opened my zipper tape to keep the zipper foot out of the way. In the pic below, I was attaching the left side pocket panel with the lining side of the pocket facing up and the zipper facing down. You can see in the top pic below that I have the zipper tape positioned so that the metal at the top is up to the crease in the pocket panel fold. The bottom pic shows how to pull the zipper tape at the top out of the way, and to fold the other half of the pocket panel over the zipper tape. Stitch 1/4" and fold the side panel to right side out.

*You can also see in the pic that I pinned the ribbons and scissors so they wouldn't move and get caught in the zipper seams. 

Right side attachment:

I don't recall if the pattern specifies, but I basted my vinyl pocket on one main panel, and then basted my completed pocket panel on top of that to keep all of the layers together nicely. 

From there, assembling the basic structure of the exterior, lining, and top zip panel was like other bags. However, attaching the zip panel to the lining felt very confusing at first. It took me some time to work it out, but now it makes sense. With your lining facing right side in, face your completed top zip panel right side up. Pin or clip all around the top, matching side seams, and sew together with 1/4" seam allowance. This is what it looks like after you stitch them together:

Then you will attach your lining with the attached top zip panel to the exterior of the bag. It looks pretty crazy when you insert the exterior into the interior (see pic below); it doesn't look like it will work, but it does. Keep your lining fabric turned with the right side in just as it was when you finished attaching your zip panel. The zip panel is facing up. The lining piece that is attached to the sides of the zipper (the red fabric here) is what you will attach to the top edge of the exterior of your bag. Make sure the actual zipper and the panel around it (the green fabric here), is pushed down out of the way. 

Matching side seams, work your way around the bag, pinning or clipping the exterior of the lining. It will look like this when you are done. Attach with 1/4" seam allowance.

Hopefully you left an opening in the bottom lining of your bag to turn everything right side out. It will look like this:

The pattern calls for stitching each side of the handles down with one short seam and adding the rest of the handle detail at this step. Oh my word, this was fiddly and made me sweat because you have to open the hole in the bottom of your lining to make a space to stitch down the handles to the exterior panel only, and not the lining fabric. In the future, I think I will make my lining opening larger than 5-6" to give myself more room to maneuver. These handles are not my best handles ever, but it's ok - it's a learning process. 

The faux binding (my term for it, but surely not the actual technical term) on this bag is really genius. It saves a lot of time and looks pretty good. To make this lining/binding, you just allow the lining fabric to show 1/4" on the exterior of the bag. It is really easy to just eyeball it because the seam you use to attach the lining to the exterior is 1/4", so if you have that top seam facing straight up, you just roll the lining fabric back down behind it and 1/4" will naturally show on the front. Wonder clips work great to hold the fabric in place.

When I machine bind, I really like to use my walking foot to help keep my stitches straight. I switched to the walking foot, and stitched the lining/binding down in the ditch on the front.

You can see how the top lining/binding stitches look on the backside in the pic below. I didn't really know what to do with the side lining seams (red fabric) that peeked out on the interior of the bag, so I flipped up the raw edges and hand stitched them to the lining to hide them and keep that piece of fabric in place.

Attaching the snaps and button were relatively quick, but I think next time I will attach the snap to the center pocket before I attach the zippers.

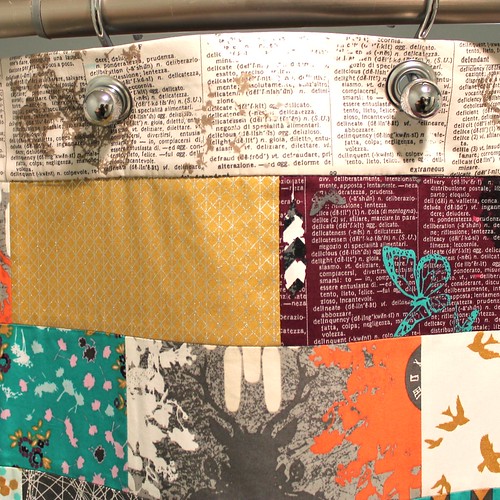
My finished product is nowhere near perfect, but I love to try new techniques, and learned a lot along the way.


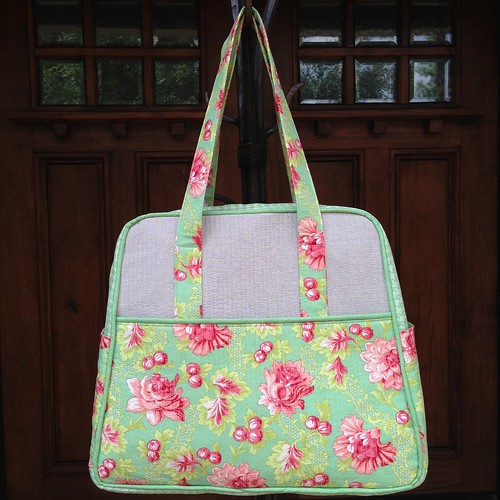
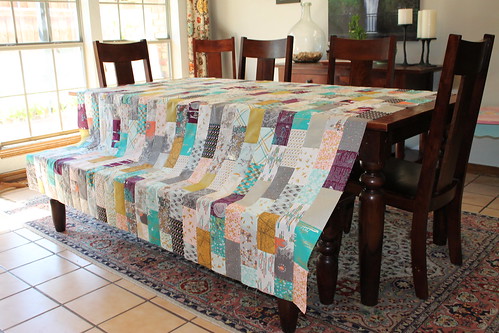
And a pic of the companion Weekender Travel Bag:

Somerset Weekender Travel Bag

Wednesday, October 15, 2014

Brick Quilt Pattern Shower Curtain Tutorial


Indelible - Brambleberry Ridge Shower Curtain

Always looking to add more quiltiness to our house, I decided to make a shower curtain for my daughters' bathroom in a longer length to account for the high shower curtain rod. (The photo above is actually my bathroom, as their bathroom is awkward to take pics of the full shower curtain. Pics of their finished space are at the end of the post.)

Brambleberry Ridge and Indelible fabric lines match my house and style perfectly. I also thought they added a touch of whimsy for the girls without being juvenile. This was important because it's a bathroom guests also use. As I told my 12 year old, I know you like this, but I really made it so I can look at it all the time. Ha

I didn't use a pattern for this shower curtain. Instead, I adopted the mentality my mom always used when sewing - take some measurements and make it up as you go along. I wanted to use a brick pattern for three reasons - it mimics the subway tile layout in the bath surround, looks great while being quick to piece, and can be hemmed on the sides and bottom without adding sashing or cutting into a design element. 

I made notes and took pics along the way in case I want to make another one. This isn't really a full tutorial, but I'll list my notes and pics for anyone who is interested in giving it a try. This works with any 72" square quilt pattern (or 72" x 75", as I made mine)

My long shower curtain finished size: approximately 70" wide x 76" long
Standard shower curtain size: 72" x 72"

70" wide works great even on my curved rod shower curtain and was a good width for the quilt pattern I wanted to use without waste. With my higher shower curtain rod, 72" length is too short, so I added three additional inches. By omitting one row on the shower curtain, finished size is 73" if hemmed with a 1.5" width. Hem and top panel widths can also be manipulated to slight adjustments. I hemmed the bottom of my shower curtain last in order to double check length.

This is not a waterproof shower curtain. Add a vinyl/waterproof lining to the back when you hang it in your bathroom.

Materials
  • For long length use (300) 3.5" x 6.5" rectangles to make 72 1/2" x 75 1/2" front (size prior to top panel and hemming)
    For standard length shower curtain use (288) 3.5" x 6.5" rectangles to make 72 1/2" square front (size prior to top panel and hemming)
  • 2 width of fabric x 6" for top panel piece
  • heavyweight interfacing or SF101 shape flex interfacing - 6" x 72"
  • 1 full size flat sheet for backing (I bought the cheapest one I could find at Target)
  • (12) 7/16" grommets - get the kit so you have the tools needed to install
Cutting and Layout


I drew a 72" square layout with 12" blocks just to get a visual of the shower curtain before cutting.


 Long shower curtain layout - 25 rows x 12 rectangles per row = 300 rectangles
Standard shower curtain - 24 rows x 12 rectangles per row = 288 rectangles

From fat quarters: 3.5" x 19.5" strips yield three 3.5" x 6.5" rectangles each

For my project:
I used 28 different fat quarters. There is no reason for this other than that is the number of fabrics I had that matched my theme. Fabric on the left is Cotton + Steel metallic basics and Violet Craft Brambleberry Ridge. Fabric on the Right is Katarina Roccella Indelible.

From my fabric, I cut:
20 fat quarters - three 3.5" x 19.5" strips and one 3.5" x 13" strip
Remaining 8 fat quarters - three 3.5" x 19.5" strips and one 3.5" x 6.5" strip
Subcut each strip into 3.5" x 6.5" rectangles

On the cutting table today 

Untitled

Piecing:

I laid out my fabrics prior to piecing and then chain pieced by row, but intrepid spirits can simply grab and piece randomly - 12 rectangles per row. Every other row, I slid each rectangle over to the left halfway, cut one end rectangle in half (into two 3.5" x 3.25" pieces), and used one at each end of the row. The rows that have not been cut end up a bit longer than the other ones this way, but I just pieced all in one direction, then trimmed the side even.

Untitled

I pressed my seams open to lay as flat as possible.

Pressing seams open is my favorite

Backing:

I dislike measuring and cutting large pieces of fabric, so I tried to keep this as simple as possible. I bought a cheap full size flat sheet from Target, pressed it well, and then laid it on the floor. I laid the shower curtain front on top, and spray basted in place. I wasn't overly concerned about it laying completely flat because I just wanted it to adhere temporarily. So I decided not to tape the back to the floor before basting. I cannot recommend this method - it was more work in the end - but it didn't have any large wrinkles either, so it worked out. In the future, I would recommend to trim down the sheet a little bit and tape it to the floor as though you are basting a quilt. I didn't use batting, but batting can be used if you want to quilt the layers. 

Untitled 

After basting the layers together, trim the backing to the size of the front.

007

Top Panel:

Piece the two WOF x 6" strips on one short edge, making one long piece. Fuse the interfacing on the back. I was lazy and didn't measure my cotton fabric length. I just fused the interfacing on the back, then attached the fused top panel to the top of the shower curtain with 1/4" seam allowance, and trimmed off the excess. Press the seam toward the top of the shower curtain. 

A note about interfacing: I was lazy about that as well.  I didn't really want to measure a long piece of interfacing and have a 6" chunk missing 72" down my bolt. I cut 4 pieces by the 20" width of shape flex. The last piece I cut down to 6" x 12". I fused the pieces on the back of the top panel, slightly overlapping the edges.

Hem the Sides:

On each side, fold over the raw edge 1/2" and press. Fold over another 1/2", press, and topstitch in place.

On each hemmed section, I used school glue to baste the raw edge down when I folded and pressed it. It helps the two layers of fabric lay nicely. (Tip: if you glue baste, use the iron to heat set the glue.) I then used wonder clips to hold the fabric in place to topstitch.

Hem the Top Panel:

Fold the top raw edge of the top panel down 1/2". Fold the top down again so that the top folded edge is over the stitching line by at least 1/8". I glue basted the second fold as well. Steam a Seam also works really well to hold the fabric in place.

Flip the shower curtain to the front and stitch in the ditch where the top panel meets the body of the shower curtain.

019


Hem the Bottom Panel:

Fold over the raw edge 1/2" and press. Fold over another 3/4" and press. Topstitch in place.

Again, you can adjust the hem length to add or subtract length.

022

Add Grommets:

I purchased Dritz grommets at Joann Fabric. I bought a kit with 10 grommets, and a refill pack with 10 grommets. 12 are needed for a shower curtain. 

You can use an old grommet shower curtain to measure hole placement. I used the following measurements, tracing the inside of the grommet holes onto the fabric, with success:

From top edge: top of circle 5/8" down
First and last grommet: outside of circle 1 3/4" from outside edge
All other grommets: 5 1/2" apart from edge of circle to edge of circle

The grommet tool kit explains how to use them; it is not hard, so don't be scared. I poked a hole in the center of the circle I drew with an awl, cut the fabric inside the the circle to just barely inside the lines I drew. The grommets should be snug, but not tight, and definitely not loose.

You do need to whack the grommets pretty hard (try not to hit your fingers). Make sure to attach the grommets on a hard surface like concrete, and not on wood floors or precious tile.

034


046

Add a vinyl shower curtain liner to the back, and you are done!

Here is the shower curtain in its permanent space.

042


041

Monday, October 13, 2014

Scrappy Patchwork Lanyards and Key Fobs


My second daughter is in sixth grade this year and is now required to wear an ID badge on a lanyard. I decided to make her a scrappy lanyard. I looked around on the internet to find a basic lanyard tutorial, and I really like construction method used in Ellison Lane's tutorial. I made a couple of adjustments (for length and scrappiness), but my hardware is attached using the tutorial method.

I pulled out a few scrap bins and had my daughter dig through to find fabric for her lanyard. (Our doodle wanted to be part of the process.)


She selected so many fabrics that I made a super scrappy lanyard. I cut (36) 1.5" tall x 2.5" wide strips. I chain pieced, added interfacing to the back. To attach the hardware, press down the center lengthwise, open and press the outside edges in to the center crease, as in bag strap construction. Slide the lanyard hardware on, attach the two ends of the fabric together with 1/4" seam, and topstitch both sides, moving the lanyard hardware out of the way as you stitch. Then stitch the hardware in place.

I also made her a 1.25" scrappy key fob using (10) 1.5" tall x 5" wide strips. I now know I prefer a bit narrower key fob and have subsequently made 1" key fobs using (10) 1.5" tall x 4" wide strips. I added interfacing, pressed in the same manner as the lanyards, topstitched, and added key fob hardware. For some of the key fobs I have made subsequently, I substituted interfacing with with 1" cotton webbing inserted after pressing, just prior to topstitching, and I prefer the feel of the webbing. To attach the hardware, I used the instructions in The Liberty Craft Blog post for key fobs

I love how her lanyard and key fob turned out!


I had so much fun making them that I decided to make some for birthday party favors for her friends in colors to suit each of their color and style preferences. I didn't want to make them quite as scrappy, and used 18 fabrics for each. I played around with some different piecing methods to quick piece using precuts and to make multiple lanyards at one time.


Mini charm lanyards
One lanyard uses (18) 2.5" mini charm squares. One mini charm pack will make two lanyards. Piece end to end, press seams, add interfacing.

Charm square lanyards
Four lanyards:
Cut 18 charm squares into two 2.5" tall x 5" wide strips to make two sets
Strip piece each set of 18, press seams, add interfacing, and cut each set in half lengthwise to make two lanyards.


Two lanyards without waste:
Cut 9 charm squares into two 2.5" tall x 5" wide strips and use each print twice for each lanyard.

One charm pack makes eight lanyards.


Making multiple lanyards using larger cuts of fabric

Super scrappy with (36) 1" finished strips
Cut (36) 1.5" tall fabrics x  multiples of 2.5" for the number of lanyards you want to make.
        ex: three lanyards = (36) 1.5" tall x 7.5" wide
Strip piece, add interfacing, subcut lengthwise into 2.5" wide strips for each lanyard.

Scrappy with (18) 2" finished strips
Cut (18) 2.5" tall x multiples of 2.5" for the number of lanyards you want to make.
       ex: four lanyards = (18) 2.5" tall x 10" wide
Strip piece, add interfacing, subcut lengthwise into 2.5" wide strips for each lanyard.

Scrappy with (9) 4" finished strips
Cut (9) 2.5" tall x multiples of 2.5" for the number of lanyards you want to make.
      ex: two lanyards = 4.5" tall x 5" wide
Strip piece, add interfacing, subcut lengthwise into 2.5" wide strips for each lanyard.

A friend of mine also asked me if I could make a shorter lanyard for her son, who uses them for his keys. The finished length is half as long as the regular lanyards - 12" long x 5/8" wide. I used
(24) 1.5" tall x 2.5" wide strips.


Making multiple 1" key fobs

Super scrappy with (10) 1" finished strips
Cut (10) 1.5" tall x  multiples of 4" for the number of key fobs you want to make.
        ex: four key fobs = 1.5" x 16" wide
Strip piece, add interfacing, subcut lengthwise into 4" wide strips for each key fob.
Alternatively, strip piece, subcut in 4" side strips for each key fob, press, insert webbing prior to topstitching.

Scrappy with (5) 2.5" finished strips 
Cut (5) 2.5" tall x multiples of 4" for the number of key fobs you want to make.
       ex: two key fobs = 2.5" tall x 8" wide
Strip piece, add interfacing, subcut lengthwise into 4" wide strips for each key fob.
Alternatively, strip piece, subcut in 4" side strips for each key fob, press, insert webbing prior to topstitching.

Single fabrics
Cut one fabric 10.5" tall x multiples of 4" for the number of key fobs you want to make.
      ex: three key fobs = 10.5" tall x 12" wide
Strip piece, add interfacing, subcut lengthwise into 4" wide strips for each key fob.
Alternatively, strip piece, subcut in 4" side strips for each key fob, press, insert webbing prior to topstitching.

Once I started making lanyards and key fobs, I had a hard time stopping! I have made several for gifts and have extra on top of that.